


Rover Mowers Limited Chip `N Shred SETTING UP
2.7 Fuel
1. Position the Chip `N Shred on a level surface in a well
ventilated area. Clean around the fuel tank cap.
2. Remove the fuel tank cap.
3. Using a clean funnel fill the fuel tank with clean fresh
unleaded petrol.
4. Replace the fuel tank cap. 5.
5. Wipe up any spilt petrol.
3. OPERATION
3.1 To start the engine - Petrol Models
Refer to the engine manufacturers instructions.
1. Move the clutch lever to the disengaged position.
2. Move the choke lever to the choke position.
3. Move the throttle lever to the fast position.
4. Move the fuel shutoff valve to the on position (if fitted).
5. Move the Stop Control switch to the on position (if
fitted).
6. Grasp the starter cord and pull.
7. When the engine starts, move the choke lever to the
run position and the throttle lever to the slow
position.
3.2 To stop the engine - Petrol Models
Refer to the engine manufacturers instructions
WARNING
Blades continue to free wheel after engine has
been switched off
1. Move the throttle lever to the off position. O
2. Move the fuel shutoff valve to the off position (if fitted).
3. Move the stop control switch to the off position (if fitted).
4. Move the clutch lever to the disengaged position if
engaged.
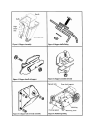
3.3 Rotor engagement - Petrol Models
1. Start the engine as per the section 3.1.
2. Move the throttle control to the fast position.
3. Slowly move the clutch lever on the left hand side of the
Chip `N Shred to the engaged position. Figure 7.
3.4 Rotor disengagement - Petrol Models
1. Move the rotor clutch lever to the disengaged position.
`O' Figure 7.
2. Move the throttle control to the slow or off `O'
position as required.
3.5 Operation - Electric Models
1. Connect the Chip `N Shred to a suitable power supply
with a 15amp rated power cord fitted with 10 amp fittings
no longer than 20 meters long. Longer cords will result
in voltage drop and possible premature overload drop
out and or possible motor damage.
2. To start the Chip `N Shred move the motor switch to the
`On' position `I'.
3. To stop the Chip `N' Shred move the motor switch to the
'Off' position `O'.
4. If the overload switch activates during operation wait 60
seconds, reset the overload and switch the unit back on.
This will allow the electric motor time to cool and the
overload switch to reset.
5. If after waiting 60 seconds the Chip `N Shred fails to
restart the following procedure should be followed.
a. Switch the machine off and disconnect the power
supply.
b. Check for blockages and that the rotor is free to
rotate. If the rotor is jammed remove the screens to
clear blockage. Refer to section 3.9.
c. Connect to the power supply and switch on the Chip
`N Shred.
d. If the Chip `N Shred will not start check the fuse or
circuit breaker on the electrical circuit being used
and rectify if necessary.
e. If the Chip `N Shred will not start and the electrical
circuit is found to be operational, contact your local
authorised Rover service dealer.
3.6 Shredding material
1. Start the Chip `N Shred engine as per section 3. L
for petol models or section 3.5 for electric models.
WARNING
Operators should always wear safety glasses,
hearing protection and gloves while operating the
Chip `N Shred.
2. Engage the rotor clutch as per section 3.3. Petrol
Models only.
3. Feed branches with foliage first into hopper so as to
control the rate of feed. Maximum branch size in
shredder hopper is approximately 20mm diameter.
4. When feeding vines or long stringy types of material
into the Chip `N Shred, cut them first into lengths of
no more than 600mm long. Be careful not to wrap
materials around hands when feeding.
5. Do not feed at a faster mate than the Chip `N Shred
can shred and discharge material, as you may stall
the rotor and overload the engine and or damage
the drive belt.
3.7 Chipper tube feeding
Feed larger branches, up to approximately 70mm diameter,
into the chipper tube. Control the rate of feed by pulling back
on the branch so as not to block the unit and cause it to stall.