


Rover Mowers Limited Chip `N Shred PREFACE
Congratulations on your purchase of a quality Australian made and owned ROVER product.
This manual covers the operation of the petrol and electric powered Rover Chip `N Shred.
Please read and understand this Owners Manual, and the accompanying Engine manufacturers manual for
petrol models.
If any point is unclear, contact Rover Mowers Limited or any authorised Rover Mower service dealer.
WARNING
The safety of the user and others
involved. Personal injury may result
should this information be disregarded
CAUTION
Follow these instructions to avoid
machine damage and possible loss of
warranty.
CONTENTS
Preface . ............................................................. iii
Safety instructions . ............................................ iv
1. Specifications ...............................................1 5. Composting . ..................................................... 6
5.1 Mulch ................................................................ 6
2. Setting up .....................................................1 5.2 Compost ........................................................... 6
2.1 Loose parts kit ...............................................1 5.3 Humus . .............................................................. 6
2.2 Hopper, handle and baffle assembly . ............2 5.4 Mulching the garden . ........................................ 6
2.3 Hopper assembly to body .:. ..........................2 5.5 Composting ...................................................... 6
2.4 Chipper tube to body . ...................................2 5.6 Suitable materials for composting . .................... 6
2.5 Mulch bag . ....................................................2 5.7 Materials that should never be composted . ....... 6
2.6 Engine lubrication - Petrol Models ................2
2.7 Fuel - Petrol Models . ....................................3
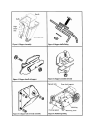
ILLUSTRATIONS
3. Operation .....................................................3
3.1 To start the engine - Petrol Models . ..............3 Figure 1. Hopper assembly . .........................................i
3.2 To stop the engine - Petrol Models ...............3 Figure 2. Hopper baffle fitting . ......................................i
3.3 Rotor engagement - Petrol Models . ..............3 Figure 3. Hopper handle to hopper . ............................. i
3.4 Rotor disengagement - Petrol Models . ..........3 Figure 4. Hopper assembly to body .............................i
3.5 Operation - Electric Models . ..........................3 Figure 5. Chipper tube to body assembly .....................i
3.6 Shredding Material .......................................3 Figure 6. Mulch bag fitting ...........................................i
3.7 Chipper tube feeding . ...................................3 Figure 7. Clutch lever - Petrol Models . ........................ii
3.8 Screens .........................................................4 Figure 8. Screen fitting , ............................................... ii
3.9 Screen removal . ............................................4 Figure 9. Drive belt adjustment - Petrol Models............. ii
3.10 Screen fitting ..................................................4 Figure 10. Drive belt adjustment - Electric Models .......... ii
4. Maintenance Figure 11. Chipper blade removal and fitting................... ii
4.1 Oil Change - Petrol Models.............................4 Figure 12. Rotor assembly.............................................. ii
4.2 Lubrication points - Petrol Models...................4
4.3 Drive belt adjustment - Petrol Models .............4
4.4 Drive belt adjustment - Electric Models . ........4
4.5 Chipper blade removal and fitting . .................5
4.6 Chipper blade sharpening .............................5
4.7 Flails .............................................................5
4.8 Flail removal . ................................................5
4.9 Flail fitting . ....................................................5
4.10 Routine maintenance......................................5