


6
OPERATING INSTRUCTIONS
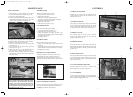
AUTO - DRIVE OPERATION
Forward and reverse movement of the mower is controlled by the drive selector pedal. Ground speed of the ride-on
mower is controlled by the amount of pressure on the drive selector pedal. Ensure that the mower user is familiar
with this means of operation before operating the mower, particularly in tight confined areas.
TO START ENGINE
NOTE:
The engine will not start unless the cutter
drive is disengaged, and clutch/brake
pedal is depressed and parking brake
applied.
1. Depress clutch/brake pedal – Apply the parking
brake.
2. Move the drive selector to neutral.
3. Disengage the cutter drive.
4. Move the throttle lever to the choke position.
5. Turn the ignition key to the start position and release
when the engine starts.
6. Move the throttle lever to about 1/4 position.
TO MOW OR DRIVE
1. Depress clutch/brake pedal.
2. Disengage the parking brake.
3. Select height of cut.
4. Move throttle to about 3/4 position.
5. Engage cutter drive.
6. Select desired drive.
7. Slowly release clutch/brake pedal and move off.
TO STOP ENGINE
1. Depress clutch/brake pedal.
2. Shift the drive selector to neutral.
3. Disengage the cutter drive.
4. Apply the parking brake.
5. Move throttle lever to the fast position.
6. Turn the ignition key to Off. Remove the keys.
TO STOP IN AN EMERGENCY
1. Depress brake/clutch pedal and drive selector pedal
together. (This disengages power from the engine
and engages the disc brake.)
2. Apply park brake and lock.
3. Move throttle to fast position and switch off ignition
key.
4. Dismount from the mower if it is safe to do so.
ENGAGE CLUTCHES
When engaging the cutter drive lever or releasing the
clutch/brake pedal, always operate slowly. Do not use a
jerking motion. Moving these controls too fast could
possibly overload and stall the engine.
REMEMBER
1. Always look behind the machine before reversing.
2. Do not refuel when the engine is running or while the
engine is hot.
3. Keep bystanders away – Keep hands and feet clear of
moving parts.
4. Keep the machine clean of grass and debris.
5. Keep all safety devices (guards and switches) in
place and working.
6. Dirt or abrasives entering the engine via the air
cleaner due to –
(a) The air cleaner element not being serviced
regularly, or
(b) The air cleaner damaged or dislodged.
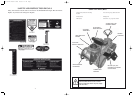
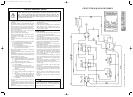
MAINTENANCE
Fig. 22
Fig. 23 Fig. 25
Fig. 24
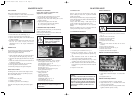
AUTO-DRIVE
The Auto-Drive friction plates and drive pulleys are
factory set for travel required along a keyed shaft and
this should not need adjusting.
If during operation it is found that the relationship
between forward and reverse has become unbalanced
adjust as follow:-
1. Loosen Locknut (A) Fig. 22
2. Centralise engagement lever with the friction plates
between the drive pulleys.
3. Re-tighten locknut (A). Fig. 22
DRIVE CHAIN ADJUSTMENT
Primary
1. Loosen off bolt ‘A’ Fig. 23
2. Slide idler back till chain tightens.
3. Re-tighten bolt ‘A’ and check chain for tight spots.
Secondary
1. Loosen off bolt ‘B’ Fig. 23
2. Slide sprocket back till chain tightens.
3. Re-tighten bolt ‘B’ and check chain for tight spots.
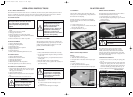
DRIVE SELECTOR PEDAL
The pedal angle can be tilted either forward or back to
suit individual requirements if necessary.
1. Loosen locknuts (A) on control rod. Fig. 24
2. Tilt control pedal to required angle to give maximum
operator comfort.
3. Re-tighten locknuts.
AUTO BELT TENSIONER
The continuous drive belt is kept under constant
tension by the Auto-Belt tensioner. This is set up
initially at the factory and should not need attention
unless the drive belt has stretched past its serviceable
use, indicated when the spring finger is engaged in red
area on the rack assembly.
TO REMOVE OLD BELT
1. Loosen the two nuts (A) securing the spring plate.
Fig. 25
2. Remove the top bolt (B) from the spring plate while
holding the spring plate and slowly release the
tension on the spring and disengage the spring finger
from rack assembly by pressing outwards. Fig. 25
3. Remove old belt from around pulleys and discard.
11
SPRING PLATE
SPRING FINGER
B
A
A
WARNING
To avoid loss of control always
come to a complete stop before
changing drive direction and
slow down before turning.
CAUTION
A check after the first two hours
of operation is recommended.
Engine failure or rapid engine
wear mainly results from the
following causes –
WARNING
The parking brake should always
be applied before leaving the
machine. The parking brake
must be released before
attempting to drive. Depress the
clutch/brake when starting or
coming to a rest. Do not use
sudden directional reversal which
can cause wheel spinning.
CAUTION
Do not over-tension belts or
drive chains.
2303 Current Artwork 7-2003 18/5/06 2:11 PM Page 8