


9
www.remingtonpowertools.com
ENGLISH
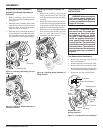
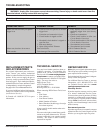
CIRCUIT BREAKER PROTECTION
This tiller is equipped with a circuit breaker
located in the top of the switch housing (see
Figure 9). The circuit breaker provides over-
current protection to the tiller motor should
the tines become jammed or locked by a
stone, root, or other obstruction.
If the circuit breaker should trip during use,
the white circuit breaker button will pop up
out of the case and the electric motor and
the tines will stop rotating.
Resetting the Breaker
1. Fully release the trigger lever.
2. Unplug the tiller power cord from the
extension cord.
3. Dislodge or remove any obstacles
from the tines which caused the tines
to jam.
4. Press the white circuit breaker button
back into the housing to reset (see Figure
9). The button should stay depressed
when released. Plug the tiller power cord
back into the extension cord.
5. Firmly grasp the tiller grip area on the
handlebar, and resume tilling.
WARNING: Always unplug the
tiller before placing hands near
the tines. Always wear gloves to
protect your hands from the sharp
edges of the tines.
Figure 9 - Circuit Breaker Button
Circuit
Breaker
Set
Circuit
Breaker
Tripped
OPERATING TILLER
WARNING: Read and under-
stand this owners manual before
operating this tiller. Make certain
you read and understand all
Safety Warnings. Improper use
of this tiller can result in severe
injury or death from fi re, electri-
cal shock, or body contact with
moving parts.
EXTENSION CORDS
Always use proper extension cords with
this tiller. Use only extension cords marked
for outdoor use. The cord must be marked
with suffi x W or W-A following the cord
type designations. Example: SJTW-A or
SJTW.
Use proper sized cord with this tiller. Cord
must be heavy enough to carry current
needed. An undersized cord will cause
voltage drop at tiller. Tiller will lose power
and overheat. Follow cord size requirements
listed below.
Cord Length AWG Cord Size
25 feet 16 AWG
50 feet 16 AWG
100 feet 14 AWG
150 feet 12 AWG
Keep cord away from rotating tines. Inspect
cord often. Replace damaged cords.
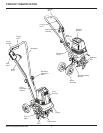
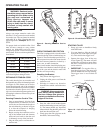
RETAINING EXTENSION CORD
The switch housing has an extension cord
hitch made from a series of alternating hooks
(see Figure 8). This feature can be used to
secure the receptacle end of the extension
cord to the tiller handle to prevent accidental
disconnection from the power cord. A belt
clip is also included to help manage the cord
by keeping it at the users side and away from
the tiller tines.
Securing Extension Cord to Tiller
1. Start at approximately 6 inches from
receptacle end of extension cord and
weave the cord between the hooks on
the switch housing as shown in Figure
8, so that the receptacle is hanging
below the switch housing.
2. Begin weaving the extension cord on
top of the bottom hook and alternate
under and over hooks so that the cord
is ultimately on top of the last hook.
3. Plug the tiller power cord into the ex-
tension cord.
Figure 8 - Securing Extension Cord to
Tiller
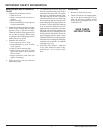
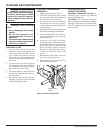
STARTING TILLER
1. Grasp grip area on handlebar fi rmly
with both hands.
2. Use your thumb to slide the lock-off
lever all the way to the right (see Figure
10). This releases the trigger lever.
3. Squeeze the trigger lever all the way
in (see Figure 10). The motor will start
and the tines will begin to rotate. Once
the tiller is started, the lock-off lever
can be released.
4. IMPORTANT: To stop the tiller, re-
lease the trigger lever. The motor will
shut off and the tines will stop rotating.
The trigger lever is now locked off
again.
Figure 10 - Lock-off Lever and Trigger
Lever
2
1
Lock-off Lever
Trigger
Lever