


www.remingtonpowertools.com
10
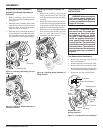
CLEARING TINES OF FOREIGN
OBJECTS
During use, a stone or root could become
lodged in the tines, or tall grass or weeds may
become wrapped around the tine shaft.
To clear the tines, release the trigger lever.
Unplug the tiller, and dislodge or remove any
obstacles from the tines or tine shaft.
To ease removal of tall grass or weeds that
are wrapped around the tine shaft, remove
one or more of the tines from the tine shaft.
See Tine Removal and Installation.
When you have cleared the tines, reinstall
tines onto tine shaft. Plug the tiller power
cord into the extension cord. Firmly grasp the
grip area of the handlebar with both hands
and resume normal tilling operation.
WARNING: Always unplug the
tiller before placing hands near
the tines. Always wear gloves to
protect your hands from the sharp
edges of the tines.
BASIC TILLER OPERATION
Use the tiller for breaking sod, preparing seed
beds, and for cultivating gardens and fl ower
beds. The tiller can also dig small holes for
planting saplings or potted plants.
Let the tiller do most of the work. The tines
will pull the tiller forward during operation.
By pulling tiller back towards yourself,
the tines will dig deeper and more aggres-
sively.
For breaking sod or deep tilling, allow the tines
to pull the tiller forward to the end of your arm’s
reach, then fi rmly pull the tiller back towards
you. By repeatedly allowing the tiller to move
forward and then pulling the tiller back to you,
the tiller will be most effective.
If the tiller digs deep enough to stay in one
spot, gently rock the tiller side to side to start
the tiller moving forward again.
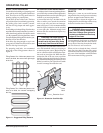
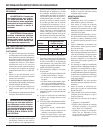
For preparing seed beds, we recommend
using one of the tilling patterns shown in
Figure 11.
Figure 11 - Suggested Tilling Patterns
Tilling Pattern One - Make two passes over
area to be tilled, the second at a right angle
to the fi rst.
Tilling Pattern Two - Make two passes over
area to be tilled, the second overlapping
the fi rst.
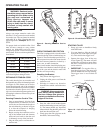
EXTENSION CORD MANAGEMENT
As with any electric lawn and garden appliance,
you will develop a common sense approach to
keeping the extension cord in a safe and logical
location as you are using the tiller.
A convenient belt clip is included with the
tiller to enable you to attach the extension
cord to your waist and ease cord manage-
ment (see Figure 12). It is recommended that
the belt clip and extension cord be attached
to your right side. Maintain enough slack
between the tiller and the belt clip for easy
maneuvering.
Figure 12 - Extension Cord Belt Clip
WARNING: Be aware of exten-
sion cord while operating tiller. Be
careful not to trip over cord. Keep
cord away from tines at all times.
Outer
Hook
Belt
Extension Cord
If tilling rows, start with the row that is clos-
est to the household outlet you are using as
an electrical power source. Begin tilling the
row in a direction which will keep the exten-
sion cord on your right side. When the tiller
reaches the end of the row, turn to position
the tiller in the opposite direction for the next
row. Remember, keeping the extension cord
behind you and on your right side will make
it easier to manage the extension cord.
OPERATING TILLER