


200-265324
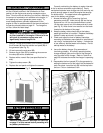
The generator engine is equipped with a dry element
air filter to block particles in the combustion air from
getting into the engine and causing excessive engine
wear. Over time this dirt builds-up on the filter, restricting
the amount of combustion air available to the engine, in
turn leading to a loss of generator power output. To
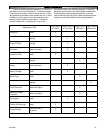
avoid these problems, periodic replacement of the
engine air filter is recommended at the intervals outline in
the service schedule table on page 21. To change the
air filter, follow the listed steps.
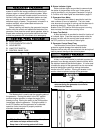
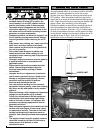
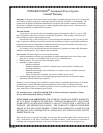
1. Using a T30 star drive wrench (not included), remove
the 4 screws (A) from the radiator end panel (B) of
the generator (see Fig. D).
2. Lift and remove the end panel (B).
3. Remove the air filter (C) by loosening the screw on
the clamp (D) with a screwdriver.
4. Replace with a new air filter (see specifications for
size).
5. Tighten the clamp screw (D).
6. Replace the end panel and tighten the screws.
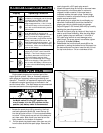
Correctly maintaining the battery at regular intervals
is vital to ensure consistent engine starting. Poorly
maintained batteries loose charge over time and may not
provide enough power to crank the engine fast enough
for reliable starts. The steps below are suggested to
care for the battery and charger.
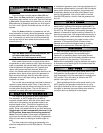
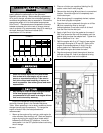
1. Access the battery (E) by removing the front
generator panels (F). Insert the key (G) into the top
locks and turn 1/4 turn counterclockwise to unlock.
Lift the panel up and out of the base and set it aside
(see Fig. E). Note: there is no need to turn the locks
located on the bottom of the panel.
2. Keep the battery cable clamps (H) at the battery
posts tight and free of corrosion. Replace the battery
cables if cracks are found in the clamps.
3. Check and adjust the level of battery electrolyte
according to the battery manufacturer’s instructions if
not using a “maintenance-free” battery. If electrolyte
is low, add only distilled water to the battery. Do not
add tap water to the battery.
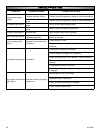
4. Insure the battery charger (I) is powered and
functioning properly. A correctly operating battery
charger displays lights on the face of the charger to
relay the state of the charger. Refer to Table A on
page 25 to assess the mode the charger is operating
in.
5. Reassemble the front panels (F) to the generator by
setting the bottom end of the panel into the base and
push into place. Insert the key (G) into the top locks
and turn 1/4 turn clockwise to lock.
BB
BB
AA
AA
TT
TT
TT
TT
EE
EE
RR
RR
YY
YY
MM
MM
AA
AA
II
II
NN
NN
TT
TT
EE
EE
NN
NN
AA
AA
NN
NN
CC
CC
EE
EE
Fig. D
EE
EE
NN
NN
GG
GG
II
II
NN
NN
EE
EE
AA
AA
II
II
RR
RR
FF
FF
II
II
LL
LL
TT
TT
EE
EE
RR
RR
CC
CC
HH
HH
AA
AA
NN
NN
GG
GG
EE
EE
Fig. E
CCAAUUTTIIOONN
• Never run this equipment without the complete
air filter installed on the engine. Failure to do so
will result in premature engine wear and
significantly reduced engine life.
WWAARRNNIINNGG
• Read and understand all warnings and cautions
on page 15 of this manual before preceding with
any battery maintenance.