13
OPERATING THE COUPLER
This model is equipped with a coupler which
enables optional attachments t o be installed.
The optional attachments are:
MODEL:
Edger PP1000E.......................
Cultivato r PP2000T....................
Blower PP3000B......................
Brush cutter PP4000C..................
Pruner PP5500P......................
WARNING: Alwaysstopunit anddis-
connect s park plug beforeremoving or instal-
ling attachments.
REMOVING PRUNER ATTACHMENT
(OR OTHER OPTIONAL ATTACH-
MENTS)
CAUTION:
When removing or installing at-
tachments, place the unit on aflat surface for
stability.
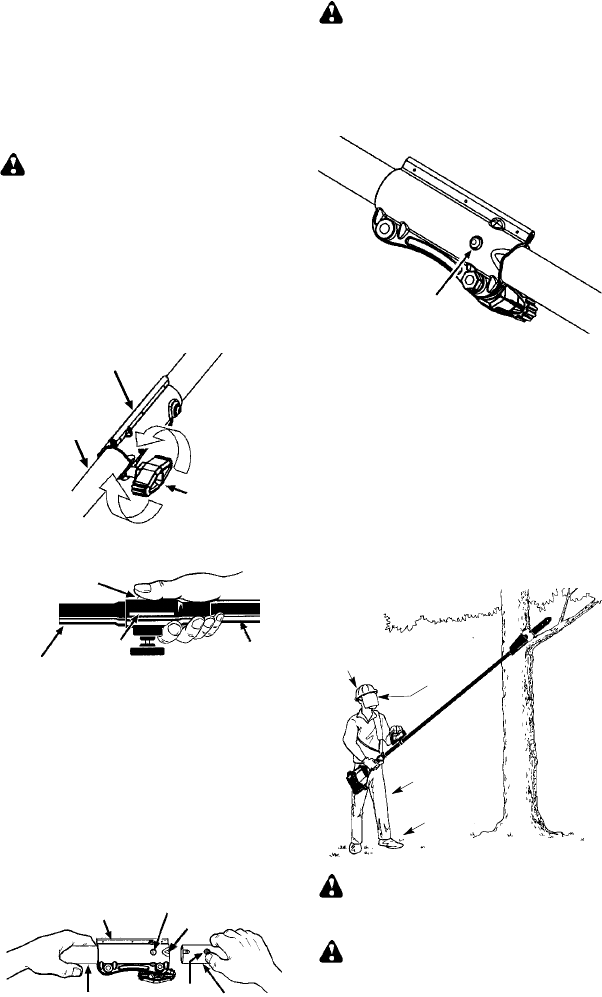
1. Loosen the coupler by turning the knob
counterclockwise.
Attach m ent
Coupler
Knob
LOOSEN
TIGHTEN
2. Press and hold the locking/r elease button.
L
ocking
/
Release
Button
Coupler
Upper Shaft
Lower Attachment
3. While securely holding the engine and
upper shaft, pull the attachment st raight
out of the coupler.
INSTALLING OPTIONAL ATTACH-
MENTS
1. Remove the shaft cap fr om the attach-
ment (if present).
2. Position locking/releasebutton of attach-
ment into guide recess of coupler.
3. Pushthe attachmentintothe coupleruntil
the locking/release button snaps into the
primary hole.
4. Before usingtheunit,tightenthe knobse-
curely by turning clockwise.
Coupler
Primary Hole
Upper
Shaft
Locking/
Release
Button
Attach m ent
Guide Recess
WARNING: Make sure the locking/
release button is locked in t he primary hole
and the knob is s ecurely tightened before op-
erating the unit. A ll at tachments ar e de sig ne d
to be used in the p rimary hole unless otherwi se
stat ed in the applicable a ttachment inst ruct ion
manual. Usingthe wrong h ole could l ead toseri-
ous injury o r dam age to the uni t.
Locking/Release
Button in Primary Hole
INSTALLING ATTACHMENT
HANGER
An attachment hanger is provided forstorage
when attachment is not in use.
To install hanger on attach ment:
1. Remove the shaft cap from the attach-
ment (if p resent) and disca rd.
2. Pre ss an d hold the lo cking/release button.
3. Push hanger onto the attachment until the
locking/release button sna ps into the hole.
OPE RATING INSTRUCTIONS
It is recommended that the engine not be
operated for longer than 1 minute at full
throttle.
OPERATING POSITION
Eye
protection
ALWAYS WEAR:
Long pants
Head
protection
Heavy
shoes
DANGE R: Do notextend arms above
shoulders while pruning. Do not stand be-
neath b ranch being cut.
WARNING: Always wear head, ey e,
hearing, foot and body protection to reduce
the risk of injury when operating this unit.
When operating unit, clip shoulder strap onto
clamp, stand as shown and check for the fol-
lowing:


