


11
Bring the powerhead engine to cutting speed
before entering the material to be cut.
If the blade does not turn when you squeeze
the throttle trigger of the powerhead, make
sure the attachment is fully inserted into the
coupler.
Always release the throttle trigger and allow
powerhead engine to return to idle speed
when not cutting. The b lade should not turn
while theengine is runningat idle. If theblade
turns at idle, do not useyour unit.Refer tothe
CARBURETOR ADJUSTMENT section of
thepowerheadmanualor contact your autho-
rized service dealer.
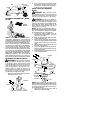
S
Maintain good firm footing while using the
unit. Do this by plantingfeet firmly in acom-
fortable apart position.
S
Cut while swinging the upper part of your
body from left to right.
S
As you move forward to the next area to cut,
b esureto m aint ainyou r bala nce, andfoot ing.
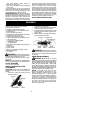
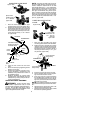
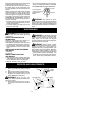
Cut using the 2
o’clock to 4 o’clock
position of the
blade
2 o’clock
4 o’clock
RECOMMENDED CUTTING POSITION
W ARNING:
The operator or others
must nottrytoclearaway cutmaterial withthe
engine running or the blade turning to avoid
serious injury. Stop engine and blade before
removing materials wrapped around blade or
shaft.
MAINTENANCE
W ARNING:
Always stop unit and dis-
connect spark plug wire before performing
maintenance.
CHECK FOR DAMAGED OR
WORN PARTS
Contact an authorized service dealer for re-
placement of damaged or worn parts.
S
BladeShield -- Discontinueuseof brushcut-
ter attachment if blade shield is damaged.
S
Trimmer Shield -- Disco ntinue use o f brush-
cutter attachment if trimmer shield is dam-
aged.
CHECK FOR LOOSE FASTENERS
AND PARTS
S
Blade nut
S
Fasteners
INSPECT AND CLEAN UNIT
AND DECALS
S
After each u se, inspect complete unit fo r loose
or damaged parts. Cle an the unit and decals
using a damp clot h with a m ild det er gen t.
S
Wipe off unit with a clean dry cloth.
BLADE MAINTENANCE
W ARNING:
Thebladewill continueto
spin after the engine stops or afterthe throttle
trigger has been released. To avoid serious
injury, make sure the blade has stopped
coasting anddisconnect thesparkplugbefore
performing work on the blade.
W ARNING:
Always replace a blade
thatis bent,warped,cracked, broken,ordam-
aged in any other way. N ever attempt to
straighten and reuse a damaged blade. Use
only specified replacement blade. Wear pro-
tective gloves when handling or performing
maintenance onthebladeto help avoidinjury.
S
Check blade for flatness periodically. Lay
theblade ona flat surface toinspect forflat-
ness. Throw away a blade that is not flat.
SERVICE AND ADJUSTMENTS
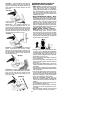
REPLACINGTHE LINE
1. Removespoolbyfirmlypullingontapbut-
ton.
2. Clean entire surface of hub and spool.
3. Replacewith a pre-wound spool, or cut two
lengths of
12-1/2
feet of 0.0 80
"
(2 mm) d i-
ameter Weed Eater
r
brand line.
W ARNING:
Never use wire, rope,
string,etc., which canbreak offand becomea
dangerous missile.
4. Insert ends of the lines about 1/2 inch (1
cm) into the small holes on the inside of
spool.
Small
Holes
Spool
Hub
Line in Notch
Line in Notch
Line exit holes