


IIIIIIIIIIII I IIII I IIII IIIIII IIII IIII IIIIIIII
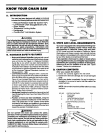
PREPARING YOUR SAW FOR USE
ii iiii i iiiiiiiiiiiiiiiiiiiiiiii
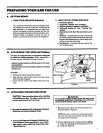
A. GETTING READY
1. READYOUROPERATOR'SMANUAL
Your Operator's Manual has been developed to help
you prepare your saw for use and to understand its
safe operation. It is important that you read your
manual completely to become familiar with the unit
before youbegin assembly or attempt operation. Your
Poulan® Dealer is available to show you how to
operate your saw. Be sure to ask for his assistance.
2. HAVE THE FOLLOWING AVAILABLE:
a. Protective gloves
b. Approved, marked, fuel container.
c. Regular gasoline, leaded or unleaded.
d. Two-cycle engine oil. See "Fueling Your
Engine"
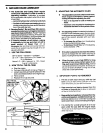
e. Barand Chain Oil. See"Barand Chain Lubri-
cant."
f. Scrench -- providedwithyoursaw.Usethe tong
end ofthetoolasaslottedscrewdriver,thesmatl
pipeend as asocketwrench,andthe largerpipe
end toremovethe spark plug.
g. Hex Wrench m providedwith yoursaw for the
fan housingscrews.
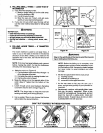
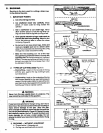
B. ATTACHING THE SPUR (OPTIONAL)
The spur is a special piece of equipment designed
to assist the cutting operation. When assembled to
the saw, the spurwilldigintothe treeor logand:
-relieve contact pressure adding ease to the saw-
ing operation.
-allow the saw to be more easily rotated or pivoted
into the cut.
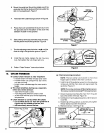
To
1
2.
.
Install:
Remove bar clamp nuts and bar clamp.
Align the spur over the two holes on the bar clamp
side of the saw. Figure 6.
Insert the two screws and tighten evenly and sec-
urely.
Figure6
ii
C. ATTACHING THE BAR AND CHAIN
ICAUTION: lWear protective gloveswhen handling
or operating your saw. The chain issharp and can
cut you even when it is not moving!
_WARNING
Do not start engine without gu!de bar and chain
completely assembled. Otherwise, the clutcn can
come on and serious inlury can result.
• Your saw is equipped with a Reduced-Kickback
Guide Bar and a Low-Kickback Chain.
• Useonlythe Reduced-Kickback Guide Bar and
Low-Kickback Chain specified for your chain
saw model, when replacing these parts. See
"Specifications"
.
Remove the bar clamp nuts and bar clamp if you
havenotdone so. Figure 6.
NOTE: Be sure toremovethe cardboard packing
over the bar studs and between the bar clamp
housing and the crankcase.
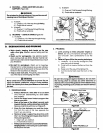
2. Turnthe adjustingscrewcounterclockwise
to move the adjusting pin almost asfar as it will
go tothe rear.Figure9.
7