


/ iii ii]1111111ilJl/ J/irll i iiii iiiiiiiii
C. STARTER ROPE
• A starter rope that breaks next to the pulley can be
repaired.
• Replacethe starter ropeifthe ropebreaks more than
2-3 inches away from the pulley as the rope will be
too short to repair properly.
A WARNING
Always wear eye protection when servicing the
starter rope. The recoil spring beneath the pulley
is under tension. If the spring pops out, serious
injury can result.
1
NOTE:The recoilspring,locatedbeneaththe pulley,
is under tension. If the spring pops out, it will
require considerable time and effort the
reinstall. For this reason, you may want to leta
qualifiedservicedealerhandlethisrepair.Ifyoudo
trytorepairthestarterrope andtherecoilspringpops
out,takethe unitto a qualifiedservice dealer.
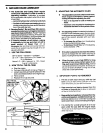
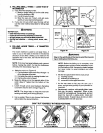
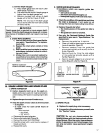
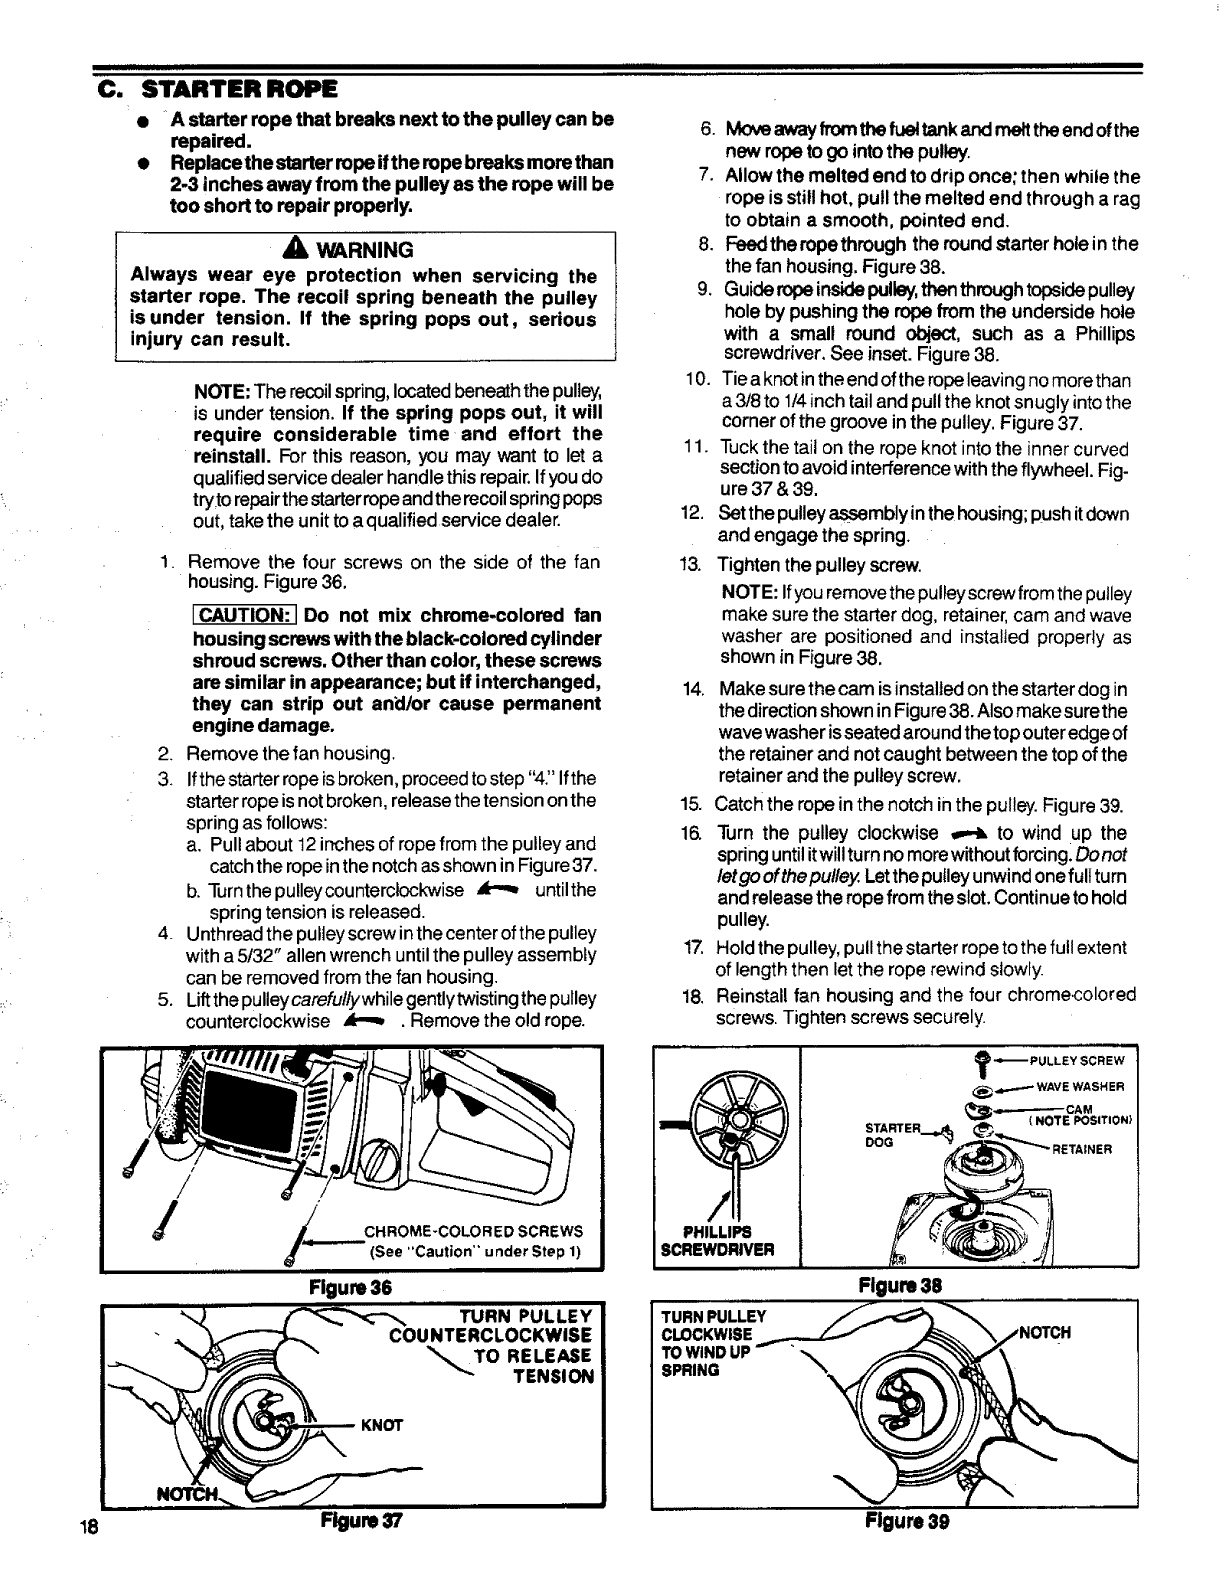
Remove the four screws on the side of the fan
housing. Figure 36,
ICAUTION:I Do not mix chrome-colored fan
housing screwswith the black-colored cylinder
shroud screws. Other than color, these screws
are similar in appearance; butif interchanged,
they can strip out and/or cause permanent
engine damage.
2. Remove thefan housing.
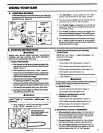
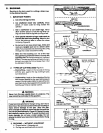
3. Ifthe starterrope isbroken, proceedtostep "4:' Ifthe
starterrope isnotbroken, release thetension on the
spring as follows:
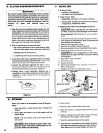
a. Pull about 12inches of rope from the pulley and
catchthe ropein the notch asshown in Figure37.
b. Turnthepulleycounterclockwise _ untilthe
spring tension is released.
4_ Unthread the pulleyscrew in thecenter ofthe pulley
with a 5/32" allenwrench untilthe pulley assembly
can be removed from the fan housing.
5. LiftthePUlleycarefu//ywhile gentlytwisting the pulley
counterclockwise _ . Remove the old rope.
/ CHROME-COLORED SCREWS
'-'-- (See "Caution" under Step 1)
Figure36
TURN PULLEY
TO RELEASE
TENSION
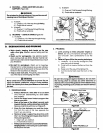
6. Moveaway from the fueltank andmetttheend ofthe
new rope to go intothe pulley.
7. Allow the melted end to drip once; then whilethe
rope is stillhot, pull the melted end through a rag
to obtain a smooth, pointed end.
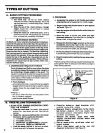
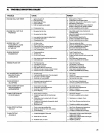
8. Feedthe ropethrough the round starterhole in the
the fan housing. Figure 38.
9. Guide rope insidepulley,thenthrough topsidepulley
hole by pushing the rope from the underside hole
with a small round object, such as a Phillips
screwdriver. See inset. Figure 38.
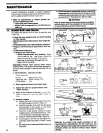
10. Tie aknot inthe end oftherope leaving nomorethan
a 3/8to 1/4inch tail and pull the knot snugly intothe
corner of the groove in the pulley. Figure 37.
11. Tuckthe tail on the rope knot into the inner curved
section to avoid interference with the flywheel. Fig-
ure 37 & 39.
12. Settheputleyassemblyinthehousing; push itdown
and engage the spring.
13. Tighten the pulley screw.
NOTE: Ifyou removethepulleyscrew fromthepulley
make sure the starter dog, retainer, cam and wave
washer are positioned and installed properly as
shown in Figure 38,
14. Make surethe cam isinstalled on the starter dog in
thedirection shown in Figure38.Alsomake surethe
wave washer isseated around the top outeredge of
the retainer and not caught between the top of the
retainer and the pulley screw.
15. Catch the rope in the notch in the pulley. Figure 39.
16. Turn the pulley clockwise _ to wind up the
springuntilitwillturn no morewithout forcing.Donot
letgo ofthepulley. Letthe pulley unwind onefult turn
and releasethe rope from the slot.Continue tohold
pulley.
17. Holdthe pulley, pull thestarter rope to thefull extent
of length then let the rope rewind slowly.
18. Reinstall fan housing and the four chrome_colored
screws. Tighten screws securely.
STARTER_
DOG "#
PHILLIPS
SCREWDRIVER
TURN PULLEY
CLOCKWISE
TO WIND
SPRING
Figure 38
18 Figure 37 Route 39