


REV. F 1-6-05 9 P/N 98748000
SECTION V. RELAMPING INSTRUCTIONS
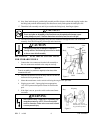
WARNING
Risk of electric shock. Disconnect power before servicing this unit. Failure to disconnect power
can result in death or severe personal injury.
1. It is desirable to reduce the water level to the lower edge of the flow director. This makes bulb
assembly replacement easier, but it is not mandatory.
2. Remove power from the unit by taking the power cord’s 3-prong plug and disconnecting it from its
electrical outlet, or in the case of a hard-wired application, by turning the respective circuit breaker
to the OFF position.
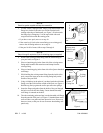
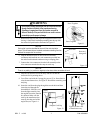
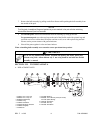
3. Remove the snap-on cord cap by inserting a slotted
screw driver into the access hole as illustrated in
Figure 20 and prying upwards.
4. Disconnect both wire connectors and put the snap-on
cord cap aside in a dry location and remove the bulb
assembly nut.
5. At this point you should have the new replacement
bulb assembly accessible and confirm that the red
cap/plug is pressed firmly into the bulb assembly to
prevent water from entering the bulb assembly.
6. If you were able to lower the water level as suggested
in step 1, then simply remove the old bulb assembly
by pulling on the flow director while pushing the bulb
assembly from the outside of the pool. If you were
unable to lower the water level, follow these
instructions: push the bulb assembly out from the
outside of the pool, keeping the back of the fitting
covered with a folded rag in the palm of your hand to
prevent water loss from the rear of the fitting body; see
Figure 4. Pull the flow director and bulb.
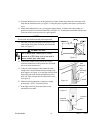
7. Take the new replacement bulb assembly with the red
cap/plug in place and insert the bulb assembly
through the flow director. Note the aligning keyway
on the bulb assembly as shown in Figure 8. The
keyway must point in the same direction as the top
key on the fitting body.
Now, from inside the pool, push the bulb assembly
with the flow director into the fitting body until both
are nearly flush against the inside pool wall. You can
now remove your hand and the fitting should again be
sealed.
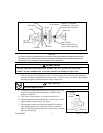
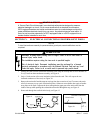
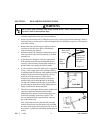
Side of
Pool
Support
Sheet Metal
Screw
Cable Clamp
to hold wire
tight against
the wall.
Pool Wall
Figure 18.
Pool Wall
Pool
Figure 20.
Figure 19.