


REV. F 1-6-05 5 P/N 98748000
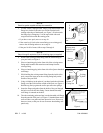
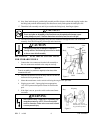
16. Now, from inside the pool, push the bulb assembly and flow director with the red cap/plug in place into
the fitting body until the bulb assembly/flow director are nearly flush against the inside pool wall.
17. Thread the bulb assembly nut until it just touches the fitting body, then finger tighten.
CAUTION
Do not over tighten as adjustability of the flow director may be impaired and/or damage to parts
causing leakage may occur. If the flow director does not rotate by hand, the nut is too tight.
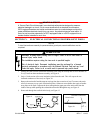
18. Take the red cap/plug off and gently bring the wire connectors through the back side of the bulb
assembly. Save the red cap/plug for storage and winterizing.
CAUTION
This lighting fixture may be damaged if subjected to
freezing weather. See winterizing instructions for details
on how to store the bulb assembly.
SECTION III. ELECTRICAL CONNECTIONS
FOR STORABLE POOLS
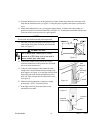
1. Connect the wire connectors from the bulb assembly to
the wire connectors attached to the snap-on cord cap.
NOTE
There is no polarity (no positive or negative) to the wires, either
connection will work.
2. Snap the cap onto the end of the body and turn so that the
electrical cord is pointing down.
3. Mount the transformer on the vertical wall using the single screw provided.
4. Plug the power cord’s 3-prong plug into an appropriate
110V GFCI protected receptacle at least 10 feet from the
pool.
5. If the light is not on, press the switch on the transformer
case once.
WARNING
Risk of electric shock. Connect only to a grounding-type
receptacle protected by a GFCI. Do not use extension
cords for connection. Failure to do so can result in death
or severe personal injury.
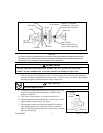
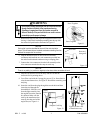
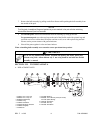
Body
Pool Wall
Wall
Flange
Liner
Gaskets (2)
Hose
Clamp
O-Ring—use silicone
lubricant only. Do not use
any petroleum products.
Key
Keyway
Figure 8.
Figure 7.