


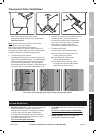

Page 11For technical questions, please call 1-800-444-3353.Item 47712
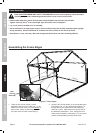
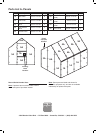
Assembling the Front Frame
3
17
1
1
13
13
2
2
39
38
19
19
23
23
23
25
25
14
12
7
6
6
(partially
behind #14)
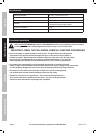
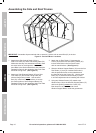
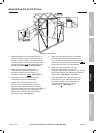
Figure I: Front Frame
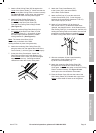
1. Attach the Right and Left Doorway Studs (6,7)
to the Front Right and Left Crown Beams (2,3)
and the Front Floor Plate (17) as shown above.
The cutoff corners on the Studs should be at the
top and should face away from the center of the
greenhouse. (See Figure I and right inset.)
2. Attach the Front Diagonal Stud (25) to
the lower Bolt on the Corner Bracket (13)
and bottom of the Front Floor Plate (17).
The flange should face inside. (See Figure I.)
3. Attach the other Front Diagonal Stud (25)
in the same way on the opposite side.
4. Attach a Front Ceiling Plate (23) to the
Bolt (43) on the Corner Bracket (13) that is
right above the Diagonal-Bracket connection.
Connect the other end to the Left Doorway Stud (7).
Attach the remaining Front Ceiling Plate (23)
between the Corner Bracket (13) and Right
Doorway Stud (6). (See Figure I.)
5. Attach the Top Doorway Beam (12) between
the Front Right and Left Crown Beams (2,3).
Turn it so that the nicked corners are facing up
and the two remaining holes are facing the outside
to allow the Door Rail (14) to be attached.
6. Attach the Vertical Extender (19) to the
Front Left Crown Beam (3) using the
Long Door Support Bolt (38) and Nut (52), with the
Door Support Spacer (39) between the Extender
and the Stud. (See Figure I, left inset.)
7. Place three Bolts (43) in the Slot at the back
of the Door Rail (14). Attach the Rail to the
Top Doorway Beam (12) and the free end
of the Vertical Extender (19), with the
rounded side up. (See Figure I.)
SAFETYFRAMEMAINTENANCE FOUNDATION