


Page 10 For technical questions, please call 1-800-444-3353. Item 47712
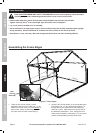
Assembling the Side and Roof Frames
36
36
35
34
34
10*
10
10*
10*
10
10*
11
11*
11*
11
11*
11*
15
15
22
22
22
22
IMPORTANT: Assemble all parts marked with an asterisk (*) above with an extra Bolt (43) in the slot.
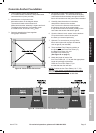
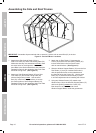
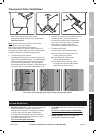
Figure H: Stud and Brace Locations
1. Attach three Side Vertical Studs (10) to a
Side Floor Plate (34) and a Side Ceiling Plate (36).
Make sure that they are assembled vertically, there
are extra holes for the diagonals. Also, include
extra Bolts in the Studs noted above with asterisks.
Repeat this Step for the remaining Side Floor Plate
and Side Ceiling Plate. (See Figure H.)
2. Attach two Side Diagonal Braces (22) to a Side
Floor Plate (34) and a Side Ceiling Plate (36)
with the flange facing inward. Use the extra
Bolt (43), noted in the caption above, to secure
the center portion of each Diagonal Brace (22).
Repeat this Step for the remaining Side Floor Plate
and Side Ceiling Plate. (See Figure H.)
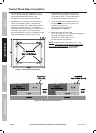
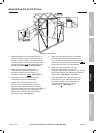
3. Attach the six Roof Studs (11) between the
Crown (35) and the two Side Ceiling Plates (36).
Include extra Bolts in the four Studs noted
with an asterisk above. (See Figure H.)
4. Slide the Window Support Beams (15) onto the four
Roof Studs (11) that you included extra bolts in,
with the predrilled holes on the underside and
the flat side facing the Crown (35). Use the extra
Bolts (43), to secure the Beam loosely in place.
It will need adjustment when installing the window.
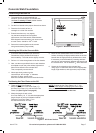
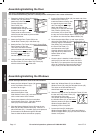
5. Using two Window Screws (45), attach each
Window Stop (18) to the Window Support Beam (15)
with its tab pointing towards the Crown (35).
Both should be on the underside of their
Window Support Beam, inside the greenhouse.
SAFETY FRAME MAINTENANCEFOUNDATION