


9
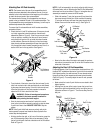
• Place a 4.95" long spacer (15) between the rear subframe
mtg./link pin support bracket and the transmission housing,
and align with the holes in both as shown in Figure 6. Insert
the long hex screw removed earlier through the bracket and
spacer and thread into the transmission housing, but do not
fully tighten.
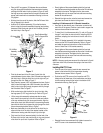
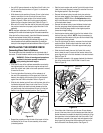
• Working from the rear of the tractor, slide the RH lower hitch
link pin almost fully to the left.
• Hold the RH lift bracket assembly (13) so that its shorter
side is to the left (toward transmission housing) and pointing
downward. Slide the shorter side of the lift bracket just onto
the hitch link pin. See Figure 7.
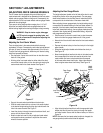
Figure 7
• Pivot the forward end of the RH lower 3-point hitch link
upward between the two sides of the lift bracket and align with
the hitch link pin. Slide the hitch link pin to the right until just
through the hitch link. Refer to Figure 7.
• Place the short spacer (.625" long) between the lower 3-point
hitch link and the longer side of the lift bracket; then slide the
hitch link pin to the right through the spacer and fully through
the lift bracket. Refer to Figure 7.
• While continuing to slide the hitch link pin to the right, slide
the long spacer (1.125" long) onto the pin. Refer to Figure 7.
• Lift the sway chain assembly and separate the two sway
chain clevis links to position a link on the inside and outside
of the rear subframe mtg./link pin support bracket. Align the
holes of the clevis links with the hole in the mounting bracket;
then slide the hitch link pin toward the right through the clevis
links and mounting bracket. Refer to Figure 7.
• Make sure the dowel pin on the left end of the hitch link pin
aligns with the slot in the hub of the retainer bracket on the
transmission housing and slide the pin fully to the right.
• Fully insert the klik pin (removed earlier) into the hole of the
RH lower hitch link pin, and pivot the klik pin ring over the end
of the hitch link pin to lock in position. Refer to Figure 7.
RH Lower Hitch
Link Pin
RH Lift Brkt.
Assembly
RH Lower
Hitch Link
Short Spacer
Long Spacer
Sway Chain
Clevis Link
Klik Pin
Rear Subframe Mtg./
Link Pin Support Brkt.
• Evenly tighten all the screws fastening both the front and
rear subframe mounting brackets to secure the RH subframe
assembly to the tractor. Re-tighten the four hex screws
and flange lock nuts to secure the front subframe mounting
bracket to the subframe rail.
• Reinstall the right rear tire, raise the tractor and remove the
jack stand, and lower the tractor to the ground.
Installing LH Subframe and LH Lift Bracket Assemblies
• Use a jack to raise the left rear of the tractor so that the left
rear tire is off the ground. Position a jack stand to support the
tractor and remove the left rear wheel.
• To install the LH subframe assembly (2), refer to Figures 4
through 7 and follow the instructions for installing the RH
subframe, adapting the instructions to the left side of the
tractor.
• The LH lift bracket assembly (14) is installed in the same
manner as the RH lift bracket assembly. Refer to Figure 7
and adapt the previous instructions to the left side of the
tractor to install the LH lift bracket assembly.
• Evenly tighten all the screws fastening both the front and
rear subframe mounting brackets to secure the LH subframe
assembly to the tractor. Re-tighten the four hex screws
and flange lock nuts to secure the front subframe mounting
bracket to the subframe rail.
NOTE: If the sway spring was removed from the tractor’s 3-point
hitch lower hitch links, reconnect the spring to the lower hitch
links now.
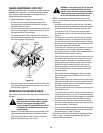
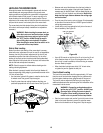
Installing Mid PTO Cover
• From the rear of the tractor, locate the two rearmost hex
screws in the bottom/left of the transmission housing.
Remove the two screws. Refer to Figure 8.
• Position the mid PTO cover so that it cups the mid PTO
linkage at the left lower/rear of the transmission, and align
its two mounting holes with the holes in the bottom of the
transmission housing. See Figure 8.
Figure 8
• Reinstall the two hex screws and fully tighten to secure the
mid PTO cover on the transmission housing.
Mid PTO
Cover
Hex
Screw