


- 17 -
the CDS knows no bounds — any celestial object, including
comets, asteroids, etc., are easily found, provided accurate
coordinate data has been entered.
To enter a new pointing position in Right Ascension and
Declination, press and hold the GO TO key until a double beep
is heard. A blinking cursor appears over the R.A. coordinate
numbers. Using the numbers on the keypad, type in the new
Right Ascension coordinate numbers. Then, press the ENTER
key. The blinking cursor is now over the DEC coordinate
numbers. Enter the new Declination coordinate numbers, then
press the ENTER key. At this point the CDS slews to the new
coordinate position.
When it is necessary to enter a negative Declination setting,
move the blinking cursor over the + symbol with the W key and
then press the NEXT key to get the - (minus) symbol, then move
the blinking cursor to the first number with the E key and enter
the new coordinate numbers. If there is are already at a minus
(-) Declination setting, follow the same instructions as above but
press the PREV key instead to get the + symbol.
3. MODE THREE: CLOCK/CALENDAR
The continuously operating clock and calendar is the heart of the
CDS. At power up, the telescope’s accurate sidereal clock
automatically performs orbital calculations of the planets, and
figures the correct stellar precession for the CDS's superior
pointing ability.
The CDS comes with a long-life lithium battery back-up, making
it unnecessary to enter the local time and date every time the
system is powered up, thus enhancing the user friendly aspects
of the instrument.
To set the local time and date and to enter the correct GMT
offset, refer to page 6, Entering the Local Time and Date.
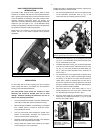
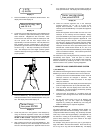
The long-life lithium battery (Panasonic CR2032 3 volt or
Duracell DL2032B) is stored behind the #1697 Control Panel,
Fig. 5. See Appendix E (page 50) for battery replacement
information.
4. MODE FOUR: TIMER/ FREQ
A. TIMER Option
The TIMER option is designed for accurately timing different
observing or imaging tasks for up to twelve hours. Counting
down to zero, in the hours, minutes, and seconds format, the
CDS beeps to notify an observer that the time is up.
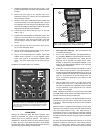
To set the TIMER, move the LCD arrow to TIMER= 00:00:00.
Then press and hold the ENTER key to get the double beep tone
and the blinking cursor. Enter the number of hours, minutes, and
seconds that you require. If it is necessary to correct an error in
entry, use the "E" and "W" keys to move the blinking cursor and
then type in the correct information. After entry, press the
ENTER key again. When you are ready to start the count-down,
press the ENTER key once more. To pause the count-down
press ENTER again, and then again to resume.
If an automatic 12 hour count-down is desired, press, but do not
hold, the ENTER key. Then press ENTER to begin the count-
down.
B. FREQ Option
The FREQ (Frequency) option allows a user to digitally adjust the
tracking speeds (not slew speeds) of the CDS in tenths of a hertz
FREQ = 60.1 M
FREQ = 60.1M ↕
from 55.0 Hz to 65.0 Hz. With this option, it is possible to match
virtually every celestial motion in the sky, including the King rate
(for tracking objects within 20 degrees of the horizon). Some
popular drive rate settings are:
Frequency Rate Description Notes
60.1 Hz Q Sidereal rate; Default rate at power
Quartz setting up. Gives sidereal
frequency accuracy to
+/-.005%, also Smart
Drive training rate;
Best for most
astrophotography.
60.0 Hz Solar and Average rate for
planetary rate tracking planets;
actual rates vary due
to retrogrades,
oppositions, etc.
57.9 Hz Lunar rate Best rate for tracking
the Moon.
Note: It is best to train the Smart Drive in the 60.1 Hz Q setting
(see SMART menu file on page 12). The Smart Drive gives
periodic error corrections in all of the other frequency settings.
There are three menu file options in the FREQ option. To view or
set the options, move the LCD arrow to FREQ= and press the
ENTER key. At power up, the FREQ= default is the 60.1Hz Q
setting. The quartz rate is precisely fixed and cannot be altered.
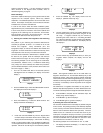
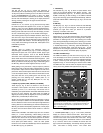
To choose a rate other than the quartz setting, press the ENTER
key to see 60.1 M (Display 29) and then again to see 60.1 M with
the up and down LCD arrow (Display 30). These two options can
adjust the tracking speeds. The adjustment techniques are
described below:
Display 29
Display 29 shows the manual rate menu file option that can be
adjusted by pressing and holding the ENTER key to get the
double beep tone and the blinking cursor. Type in the new rate,
then when finished, press the ENTER key again.
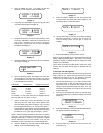
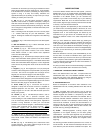
Display 30
Display 30 shows the menu file option allows you to step the
drive tracking frequency setting in tenths of a hertz, by using the
PREV and NEXT (up and down arrow) keys. This is a convenient
feature if you are trying to match the precise speed of a planet,
comet, or any other non-stellar object. To exit this option, press
the MODE key.
5. MODE FIVE: KEYPAD OFF/ BRIGHTNESS ADJUST
In order to see very faint objects, it is sometimes necessary to
either dim or completely turn off the Keypad red LED
backlighting. To do so, press the MODE button until the display
goes blank. This is the OFF option.
To set the Keypad brightness, press the ENTER button and
adjust the brightness to your satisfaction with the PREV and
NEXT keys. To exit, press the MODE key.