


19
How to Easy Align Your Telescope
If you have just applied power to Autostar, perform steps 1 through 5. If you have already per-
formed the initialization procedure, go to step 6.
1. Sun Warning - Press the key prompted by Autostar to accept.
2. Getting Started - Press ENTER to continue.
3. Enter Date - Enter the current date as previously described, then press ENTER.
4. Enter Time - Enter the current time, as previously described. Select "AM," "PM," or 24-hour
clock (blank). Then press ENTER.
5. Daylight Savings - Select “Yes” or “No,” then press ENTER.
6. Alignment Option Screen - “Setup: Align” displays. Press ENTER.
7. Select Alignment - “Align: Easy” displays. Press ENTER.
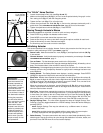
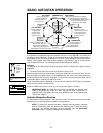
8. Set Alt/Az Home Position - Autostar then prompts you to set the telescope in the Alt/Az
Alignment home position. To set your telescope in the "Alt/Az" home position (Fig. 16):
• Loosen the telescope’s Dec. lock (10, Fig. 1).
• Level the tripod base (23, Fig.1). Level the optical tube by lining up 0° on the Dec.
setting circle (Fig. 17) with the triangular pointer.
• Tighten the Dec. lock (Fig. 17) to a firm feel only.
• Loosen the tripod base lock knob (26, Fig. 1) and turn the telescope horizontally until
it points North. See
LOCATING THE CELESTIAL POLE, page 35 for more information.
• Tighten the tripod base lock knob (26, Fig. 1). Press ENTER.
9 . Star Alignment - Autostar then chooses two stars to align upon. When the telescope
slews to the first star for alignment, it may not appear in the field of view in the eyepiece.
The alignment star should be easily recognized and be the brightest star in the area of the
sky where the telescope is pointing. Use the Arrow keys to move the telescope until the
star is visible and centered in the eyepiece. Press ENTER. Repeat procedure for the sec-
ond alignment star.
When the procedure is performed correctly, "Alignment Successful" displays. If Autostar
does not display this message, perform this procedure again.
NOTE: Autostar locates alignment stars based on the date, time, and location
entered. The alignment stars may change from night to night. All that is required is
for the observer to center the selected stars in the eyepiece when prompted.
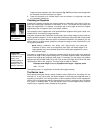
NOTE: The GO TO key also allows you to perform a "spiral search." A spiral search
is useful when the telescope slews
to an object, but that object is not
visible in the eyepiece after the tele-
scope finishes its search. (This
sometimes occurs during an align-
ment procedure.) Press GO TO
when the slew is finished and the
telescope starts slewing in a spiral
pattern at a very slow speed around
the search area. Look through the
eyepiece and when the object does
become visible, press MODE to stop
the spiral search. Then use the
Arrow keys to center the object.
Two other methods of alignment are avail-
able to the observer: Two-Star and One-
Star. These methods are included in case
the observer prefers to pick out his or her
own alignment stars.
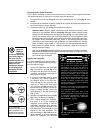
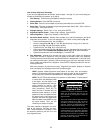
DS-2000 TIPS
Which One’s the
Alignment Star?
If Autostar has chosen an alignment star with
which you are unfamiliar, how can you be
sure if the star in your eyepiece is really the
alignment star?
The rule of thumb is that an alignment star is
usually the brightest star in that area of the
sky. When you view an alignment star in an
eyepiece, it stands out dramatically from the
rest of the stars in that portion of the sky.
If you have an obstruction, such as a tree or
a building blocking your view of the alignment
star, or if you have any doubts at all about the
star that has been chosen, no problem. Just
press the Scroll Down key and Autostar will
find another star to align upon.