


page 8
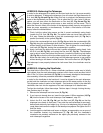
How to Assemble Your Telescope
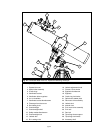
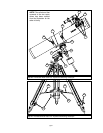
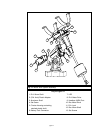
The giftbox contains the optical tube assembly and the tripod with the equatorial
mount. The accessories are located within compartments custom-cut into the styro-
foam block inserts. Refer to Figures 1, 2a, 2b, and 2c for images of the parts and the
overall assembly of the 4504 telescope.
1. Remove the components from the giftbox: Remove and identify the telescope’s
standard equipment. For a listing of parts that are included in the giftbox, see
pages 4 and 5. When removing the tripod from the giftbox, hold the assembly
parallel (horizontal) to the ground or the inner tripod leg extensions will slide out
as they are not locked in place.
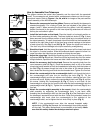
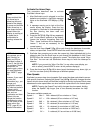
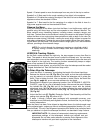
2. Install the lock knobs on the tripod: Place the tripod in a horizontal position on
the floor before performing this step. The three tripod lock knobs (7, Fig. 1) have
been removed from the bottom section of each tripod leg to insure safe arrival of
the tripod assembly. To install, thread each tripod lock knob into the threaded hole
located at the right side of each of the three gray-colored castings at the bottom
of each tripod leg. See Fig. 3, and 29, Fig. 2c. Tighten the tripod lock knob to a
"firm feel" only to avoid damage to the tripod caused by overtightening.
3. Stand the tripod: Hold the mount for support (the mount will be loose) and stand
the tripod in a vertical position. Slide the cardboard sheath upward to allow it to
come free when the tripod legs are spread out during the next step.
4. Adjust the tripod legs. Spread the tripod legs as far as they will open, so that the
leg braces (28, Fig. 2c) are taut. Should one of the leg braces slip out of the center
triangle fastener, reposition the brace and slide it back into the triangle fastener.
5. Attach the accessory shelf to the tripod: Remove the mounting knob from the
round accessory shelf (6, Fig. 1). Place the accessory shelf on top of the center
triangle leg brace fastener so that the threaded stud protruding from the bottom of
the shelf (Fig. 4) passes through the hole in the center of the triangle fastener.
Next, thread the mounting knob shaft into the threaded stud. Tighten to a firm feel.
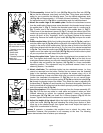
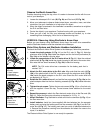
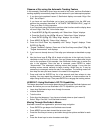
6. Attach the counterweight to the counterweight shaft: Look through the hole in
the counterweight and note the pin blocking the hole (Fig. 5). Tilt the
counterweight slightly and the pin moves out of position, clearing the hole. If the
pin does not move, slightly unscrew the counterweight lock knob (Fig. 5) until the
pin moves. Holding the counterweight (8, Fig. 1) firmly in one hand, tilt the
counterweight to move the pin from the hole and slip the counterweight onto the
counterweight shaft (9, Fig. 1). Tighten the counterweight lock knob (Fig. 5) to a
firm feel.
7. Attach the counterweight assembly to the mount: Attach the counterweight
shaft assembly by supporting the counterweight firmly in one hand, while
threading the counterweight shaft into the base (Fig. 6) of the Declination axis of
the telescope’s equatorial mount with the other. Once firmly attached, loosen the
counterweight lock knob, slide the counterweight to the midpoint of the
counterweight shaft, and re-tighten the lock knob firmly in place (Fig. 5).
NOTE: If the counterweight ever slips, the secured threaded safety
washer/knob (12, Fig. 2a) prevents the counterweight from sliding entirely
off the shaft. The safety washer/knob is pre-attached at the factory. Make
sure that this safety washer/knob always remains in place.
Fig. 3: Tripod leg lock
knob.
Fig. 5: Counterweight
and pin.
Lock
knob
Pin
Fig. 4: Accessory
shelf installation.
Fig. 6: Attach
counterweight
assembly to the
mount.
Thread shaft
into base
Threaded
hole
Sliding
inner leg
Leg lock
knob