


E
N
G
L
I
S
H
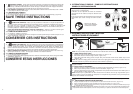
4-3 REPLACE THE SPOOL OF NYLON WIRE (FIG. 4-3)
1. Disconnect the plug from the socket.
2. Hold the spool carrier (1) firm in one hand, with the other unscrew the cover (2) as indicated by the arrow on the
cover itself.
3. Once this has been removed, extract the finished spool, clean the inside of the spool carrier and the cover
carefully, making sure not to lose the spring. Insert this into position in the spool carrier.
4. Take the new replacement spool (3), insert the ends of the wires into the holes on the cover, put the spool into
position , keeping the side with the label facing upward.
5. Fit everything into the spool carrier by pressing down and rotating clockwise until locking.
6. Take the end of the wire which is sticking out and, by pressing the button, withdraw them by at least ten cen-
timeters.
7. In the event of the wire breaking inside the spool, repeat the replacement operation.
8. Start the grass trimmer following the instructions in the “STARTING” chapter.
F
R
A
N
C
A
I
S
4-3 REMPLACEMENT DE LA BOBINE DE FIL DE NYLON (Fig. 4-3)
1. Débrancher la prise.
2. Tenir fermement la bobine de fil (1) d’une main et de l’autre dévisser le couvercle (2) comme indiqué par les
flèches se trouvant sur le couvercle même.
3. Une fois retiré, ôter la bobine, nettoyer soigneusement l’intérieur du réceptacle et le couvercle en faisant atten-
tion à ne pas perdre le ressort. Puis, l’insérer dans le réceptacle de la bobine
4. Prendre la nouvelle bobine (3) insérer les extrémités du fil dans les trous du couvercle, remettre la bobine en
place, l’étiquette vers le haut.
5. Remettre tout dans le réceptacle en appuyant et tournant dans le sens des aiguilles d’une montre jusqu’à sa
fermeture.
6. Tenir les extrémités des fils, et en appuyant sur le bouton, les faire sortir d’au moins 10 centimètres.
7. Si le fil se casse à l’intérieur de la bobine, recommencer le processus de remplacement.
8. Démarrer le coupe herbe en suivant les instructions de la section «Démarrage».
E
S
P
A
Ñ
O
L
4-3 REEMPLACE EL HILO DE NAYLON EN EL CABEZAL (FIG. 4-3)
1. Desconecte la clavija de la corriente eléctrica.
2. Sujete el porta carrete (1) firmemente en una mano, con la otra destornille la cubierta (2) tal y como se indica
con la flecha en la misma cubierta.
3. Una vez que esto ha sido removido, saque el carrete vacÌo, limpie el interior del porta carrete y la cubierta,
asegúrese de no perder el resorte, inserte el resorte en posición dentro del porta carrete.
4. Coja el nuevo carrete de hilo ( 3), inserte las puntas dentro de los orificios de la cubierta, ponga el carrete en
posición, manteniendo el lado con la insignia hacia arriba.
5. Coloque todo dentro del porta carrete presionando hacia abajo y girando a favor de las manecillas del reloj
hasta que se asegure.
6. Sujete las puntas de hilo que están fuera del cabezal,presione el botón del cabezal y jale las puntas de hilo de
tal forma que tengan una longitud aproximada de 10 centÌmetros.
7. En el caso de que se rompiera el hilo y este quedara dentro del cabezal, repita los pasos anteriores.
8. Inicie la operación de su unidad siguiendo las instrucciones en el capitulo de Encendido.
Fig. 4-3A Fig. 4-3B Fig. 4-3C
1
2
3
15
E
N
G
L
I
S
H
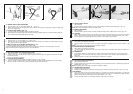
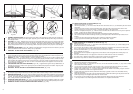
4. TRIMMING AROUND TREES. Trim around tree trunks with a slow approach so string does not contact bark.
Walk around the tree trimming from left to right. Approach grass or weeds with the tip of the string and tilt string-
head slightly forward.
5. SCALPING (Fig. 4-2C). Scalping refers to removal of all vegetation down to the ground. To do this, tilt the string-
head to about a 30 degree angle to the left. By adjusting the handle you will have better control during this oper-
ation. Always keep a distance of 100 feet (30 meters) from other people and animals when scalping. Do not
attempt this procedure if there is any chance flying debris could injure operator, other people or cause damage
to property.
6. OPERATING AS AN EDGER (Fig. 4-2D). With the unit configured as an edger, hold it so the motor is to your left
side so that debris is thrown to the rear. Always use eye protection.
7. SWEEPING - DO NOT SWEEP WITH TRIMMER (Fig. 4-2E)
F
R
A
N
C
A
I
S
4. POUR COUPER L’HERBE AUTOUR DES ARBRES. Approacher lentement de arbres, de manière que le fil de
coupe ne fouette pas l’écorce. Faire le tour des arbres dans le sens des aiguilles d’une montre. Couper avec la
pointe du fil de coupe en inclinant légèrement le coupe-herbe vers l’avant.
5. RASAGE (Fig. 4-2C). Le rasage consiste à couper la végétation au ras du sol. Pour ce faire, incliner la tête de
coupe à gauche à un angle d’environ 30 degrés. Le réglage de la poignée permettra de mieux contrôler le coupe-
herbe pendant cette opération. S’assurer qu’aucune personne ou qu’aucun animal ne soit présent dans un rayon
de 30 mètres. Ne jamais essayer de raser une zone où des débris risquent d’être projetés et causer des dom-
mages corporels ou matériels.
6. UTILISATION EN TANT QUE TAILLE-BORDURE(Fig. 4-2D). L’appareil étant réglé en tant que taille-bordure, le
maintenir de façon que le moteur soit à gauche pour que les débris soient projetés vers l’arrière. Toujours porter
des lunettes de sécurité.
7. BALAYAGE - NE PAS UTILISER LE COUPE-HERBE POUR BALAYER (Fig. 4-2E)
E
S
P
A
Ñ
O
L
4. ORILLAR ALREDEDOR DE ARBOLES. Corte alrededor de arboles sin tocar la corteza del árbol, utilice la guÌa
de corte para que por ningún motivo toque el árbol, puede dañar al árbol si le llega a cortar la corteza del mismo.
5. REMOVER VEGETACIÓN (Fig. 4-2C). Gire la unidad 30 grados hacia la izquierda. Ajustando el maneral tendrá
mejor control de esta operación. Siempre mantenga una distancia de 100 pies ( 30 metros) de cualquier persona
o animal . No intente hacer esta operación si existe la posibilidad de que alguna partÌcula pudiera dañar al oper-
ador, a otras personas o pueda dañar objetos .
6. OPERACIÓN COMO ORILLADOR (Fig. 4-2D). Con la unidad configurada como orillador, sujétela con el motor
a la izquierda, de tal forma que las partÌculas sean lanzadas hacia atrás. Siempre utilice protector para los ojos.
7. BARREDOR - NUNCA UTILICE SU UNIDAD PARA ESTE TRABAJO (Fig. 4-2E)
Fig. 4-2A Fig. 4-2B Fig. 4-2C
Fig. 4-2D Fig. 4-2E Fig. 4-2F
16