


14
A
C
|
3-3A 3-3B _ 3-3C
.._J"-
D
B
F
3-3D 3-3E
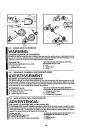
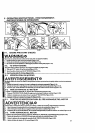
CAUTION
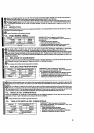
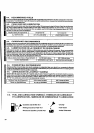
To ensure the bar and chain receive oil, ONLY USE THE ORIGINAL STYLE BAR with the oil passage hole (.A
illuslrated above (Figure 3-3A).
1. Make sure the CHAIN BRAKE e lever is pulled back into the DISENGAGED position (Figure 3-3B).
2. Remove the 2 bar retaining nuts (B). Loosen the 2 screws at the rear of the qlutch cover (C). Remove the o
(Figure 3-3C).
3. Using a screwdriver, run the adjustment screw (D) COUNTERCLOCKWISE untilthe TANG (E) (projecting pron
to the end of Its travel toward the clutch drum and sprocket (Figure 3-3D).
4. Place the slotted and of the guide bar over the 2 bar bails (F). Position the bar so that the adjustment TANG fits
the lower hole (G) on the guide bar (Figure 3-3E).
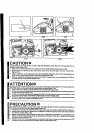
ATTENTION
Pour s'assurer que lachalne at gulde-chaios sclent huil_s, UTILISER EXCLUSIVEMENT LE TYPE DE GUIDE-CHA
D'ORIGINE ayant un orifice pour huila (A) comma i]luatr_ c]*dassus (Figure 3-3A).
t. Aasurez-vous qua ts lavlar du CHAIN BRAKE® n'est PAS ENGAGE (Flguro 3-3B).
2. Entsver lee2 ,.,Scroosde fixation (B) du gulda-chalneo Dessermr les 2 vts arri_re du carter _embrayage (C) at enk
le carter d'embrayaga (Figure 3-3C).
3. A raide d'un toumavls, toumar lavis de r6glaga (D) VERS I;A GAUCHE Josqu'_,ce qua la vls de tension -LE TENI
(E) ne puisaa plus avancar vats le tambour d'ambreyaga ot le pigoon (Figure 3-3D).
4. Positionner laguide-chalna aur tss 2 gouJons(F) de menl6re it ca qua LE TENON (lavis de taosion) polsso p6n_,
dans le trou (G) an baa du gulde-chalna (Figure 3-3E).
PRECAUTION o •
Para asegurar qua la cadena y la barra reciben acaits, USE UNICAMENTE EL ESTILO ORIGINAL DE BARRA co
hoyo de paso dal acaita (A) corno se ilostre erdba (Figure 3-3A).
1. Asegbreso qua la meniJa del CHAIN BRAKEe sea Jalada hacla arras ala posicl6n de DESENGANCHE (Flgura 3.:
2. Remueva las 2 tuarcas (B) qua roUanen la barra. Agoja los 2 tomlllos en la parte poslodor de la cubierts dal ambra
(C). Retire la cublarts (Figura 3-3C).
3. Usendo un desarmador, corm el tomlllo do eJt'zste(D) en DIRECCION CONTRARIA DE LAS MANECILLAS [
RELOJ hasta qua la (E) ESPIGA (punta de proyscck_) so encuentre al final de su recorrido hacla e{ tambo¢
embragua y el piilon (FIgura 3-3D).
4. Deslica el extremo de la barra gula sebre los dos tomillos (F) de la barre. Ponga la barra de manara qua la ESP'
de aj0ste se ajuste dentro dal oriliclo (G) interior de la barra guts (Figura 3-3E).