


Mowing
1. Lower the mowing units to the ground.
2. Engage the tractor PTO at low speed
to avoid
shock to the mower power train.
3. Select appropriate tractor gear range (maximum 5-
1/2 mph or 8.8 km/h at rated PTO speed). Refer
to Clip Ratio on page 11.
4. Accelerate to maximum PTO speed: 500-540 rpm.
DO NOT ENGAGE THE PTO WITH MOWERS
IN THE RAISED POSITION (TRANSPORT
POSITION).
DO NOT RAISE THE MOWING UNITS WITH
THE PTO ENGAGED.
MAKE SURE THE PTO IS DISENGAGED
AND THE REELS HAVE STOPPED ROTAT-
ING BEFORE RAISING THE MOWING
UNITS.
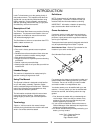
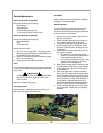
Properly adjusted and sharpened mowing units will
slice a sheet a writing paper as cleanly as a pair of
scissors.
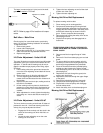
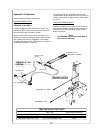
Reel Adjustment
1. Compress the telescoping arm, using the belt re-
lease hook. Refer to “MOWING UNIT DRIVE
BELT REPLACEMENT,” Step 2. On units #6 &
#7, secondary PTO must be disconnected at mow-
ing unit for (by hand) reel adjustment.
2. Once the belt has been removed, loosen both ad-
justing screw lock bolts.
3. Back off the locking bolts JUST ENOUGH TO AL-
LOW the adjusting screws to be turned.
4. Rotate the adjusting screws.
NOTE
To move the reel toward
the bed knife—turn
reel adjustment screw clockwise.
To move the reel away from the bed knife, turn
reel adjustment screw counter—clockwise.
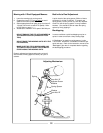
5. Slowly turn the reel by hand while inserting a double
thickness of newsprint into the cutting edges of the
mowing unit. A properly sharpened and adjusted reel
will enable you to shear one thickness of the newsprint
while only creasing the second thickness. This should
be obtained along the entire length of the reel blades.
CAUTION
6. Retighten the locking bolts. MAKE SURE THE
ADJUSTING SCREWS ARE LOCKED SE-
CURELY AND CANNOT ROTATE.
NOTE
When adjusting reels by sound, a slight blade
to blade contact noise will be heard once the
adjustment has been made. This noise will
increase until mower begins cutting grass.
IMPORTANT
Do not operate mowing units with reel blades
contacting the bed knife. Heavy metal to
metal contact could lead to wear of damage
which may require regrinding of the reel and
bed knife.
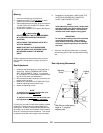
7. Once set, this adjusting mechanism is locked by
the clamping action of the reel adjustment locking
bolt.
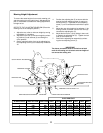
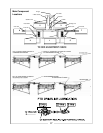
Reel Adjusting Mechanism
1"
Locking
Bolt
Adjusting
Screw
After Service, adjust spring
length to 1" using top
adjusting nuts.
10