


19
8/12/14
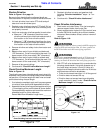
RTR12 & RTA12 Series (Serial No. 884764-) Rotary Tillers 311-785M
Land Pride
Section 2: Operating
Table of Contents
General Operating Notes
Before beginning to till the following inspection should be
performed:
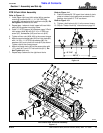
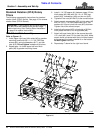
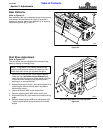
1. Check oil level in gearbox and chaincase. Refer to
“Lubrication Points” on page 25.
2. Check that all plugs have been replaced properly in
the gearbox and chaincase.
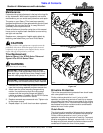
3. Be sure all tiller tines, bolts, and nuts are tight.
4. Be certain all guards, shields, and dirt deflectors are
in place and secure.
5. Grease driveline shaft and all other grease fittings.
Refer to “Lubrication Points” on page 25.
6. Clear area to be tilled of rocks, branches, and other
foreign objects.
7. Tall grass and weeds should be mowed before tilling.
8. Do not engage PTO at full throttle. Once engaged,
increase throttle to 540 PTO speed. Tiller tines will
cut better at 540 PTO speed than at reduced throttle.
9. Tilling should not be done in wet conditions as soil
will stick to tines.
10. At first begin tilling at a slow forward speed and shift
up as ground conditions warrant.
11. Operated tiller with deck level to the ground.
12. Tiller should be operated with the tiller deck level to
the ground.
13. Tiller tines will cut better when operating the tractor
at full 540 rpm PTO speed than at reduced throttle.
14. After tilling the first 50 feet, stop and check to see that
the tiller is adjusted properly.
15. Do not make turns or attempt to back up while tiller is
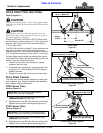
in the ground. See important note below.
16. Do not engage PTO with machine in the fully raised
or lowered position.
17. Periodically check for foreign objects wrapped
around the rotor shaft and remove them after
disengaging PTO, turning off tractor engine, and
removing ignition key.
IMPORTANT: Turning or backing up with rotary
tines in the ground will damage the tiller.
General Operating Instructions
Before using your Land Pride RTR12 or RTA12 Series
Rotary Tiller, you should have completely read the
Operator’s Manual, properly attached the tiller to the
tractor, cut the driveline to proper length, run-in the
clutch, and gone through the Operating Checklist. If you
have missed any of these steps, please complete them
before proceeding.
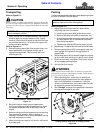
Now that you have properly prepared yourself and your
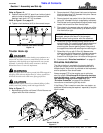
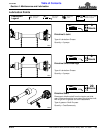
tiller, it’s time to do some tilling. Carefully drive the tractor
to the site where you intend to till. You should have
already cleaned this site of any large limbs, rocks,
trash, metal or other debris. Best results will be
achieved if you have mounted your tiller offset to the right
far enough to cover the tread of your right tractor wheel.
Line the tractor up just to the right of center on your tillage
plot. You will be working from the center out and always
turning to the right to line up for your next pass.
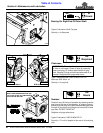
Lower the tiller half way to the ground and reduce your
tractor engine speed to about one quarter throttle.
Engage the PTO and gradually increase the engine
speed until you reach full PTO speed of 540 rpm. Lower
the tiller to the ground and simultaneously commence
forward travel of approximately 2 mph. Do not make turns
or attempt to back up while tiller is in the ground. See
important note below.
Travel about 50 ft. and then stop to check your results.
When stopping, remember to lift the tiller out of the
ground, stop the tractor, reduce engine speed,
disengage the PTO, set the park brake, shut off the
tractor, and remove the keys. If you are tilling too shallow
or too deep, adjust the skid shoes accordingly. If the soil
texture is too coarse, lower the rear deflector and reduce
your ground speed. If the soil texture is too fine, you will
need to raise your rear deflector and increase your
ground speed. For any other problem conditions that may
arise, you will want to refer to the Troubleshooting section
on page 27.
When you are done tilling for the day, make sure you use
proper tractor shut down procedures before you get off of
the tractor. If you are detaching your tiller, make sure you
park it on a dry and level surface leaving it clean and
ready for the next use. When you put your tiller up for the
season, make sure you refer to the Storage Directions on
page 24.
With a little practice and a few adjustments, you will soon
be achieving the results you want with your Land Pride
Rotary Tiller. See “Features and Benefits” Section 6
or “Specifications and Capacities” Section 5 for
additional information and performance enhancing
options.
IMPORTANT: Turning or backing up with rotary
tines in the ground will damage the tiller.