


9
Section 1 Assembly and Set-Up
12/14/01
RCR16 Series Rotary Cutters 312-742M
Land Pride
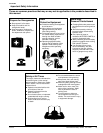
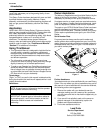
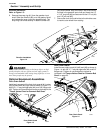
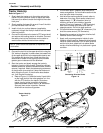
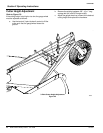
Driveline Installation
Refer to Figure 1-3:
6. Remove the snap ring (#1) from the gearbox input
shaft. Slide the driveline (#2) on to the gearbox shaft
and replace the snap ring to the gearbox shaft. The
snap ring is for extra security in case the shear bolt
(#3) should break. Align the holes in the driveline with
the hole in the gearbox input shaft and insert the 1/2”
x 3 1/2” long bolt (#3) and secure with the 1/2” nut (#4)
and 1/2” jam nut (#5).
7. Secure the chain on the driveline to the driveline cone
to restrict outer shield from rotating.
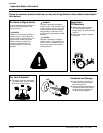
!
DANGER
Rotary Cutters have the ability to discharge objects at high
speeds; therefore, the use of front and rear safety guards is
strongly recommended when cutting along highways or in an
area where people may be present.
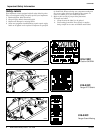
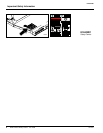
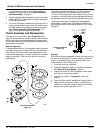
Optional Equipment Assemblies
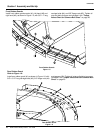
Front Chain Guards
Install each segment of the front chain guards (#1) center,
(#2) left hand and (#3) right hand as shown in Figure 1-3,
with 3/8” x 1” long carriage bolts (#4), and 3/8” flange nuts
(#5). Tighten all nuts and bolts to torque as indicated in the
“Torque Values Chart for Common Bolt Sizes”
on page 23.
Front Chain Guard
Figure 1-3
20642
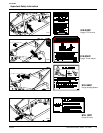
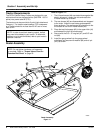
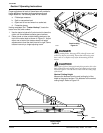
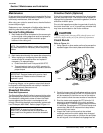
Rear Chain Guards
Install the rear chain guard (#1) (#2) and (#3) as shown in
Figure 1-4, with 3/8” x 1 ” long carriage bolts (#4), and 3/8”
flange nuts. Tighten all nuts and bolts to torque as
indicated in the“Torque Values Chart for Common Bolt
Sizes” on page 23.
Rear Chain Guard
Figure 1-4
19748
Driveline Installation
Figure 1-2
19746