


ASSEMBLY
9
MTF-041007C
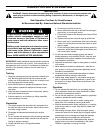
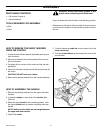
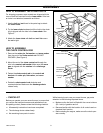
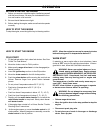
HOW TO ASSEMBLE THE LOWER CHUTE
For shipping purposes, some models are shipped with the
rear nut and bolt removed from the lower chute. If the low-
er chute is not attached, assemble as follows.
1. Use the bolt and nut found in the parts bag to attach
the lower chute.
2. Tip the lower chute backward until the hole in the chute
ring is aligned with the hole in the lower chute. See
Figure 3
3. Attach the lower chute with bolt and nut. Make sure
the nut is tight.
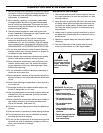
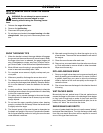
HOW TO ASSEMBLE
THE CHUTE CONTROL ROD
1. Remove the cotter pin, flat washer, and wave washer
from the end of the chute control rod. DO NOT
DISCARD. (See Figure 4)
2. Mount the end of the chute control rod through the
hole in the control rod bracket. Make sure the worm
gear is aligned with the notches in the discharge
chute.
3. Fasten the chute control rod to the control rod
bracket with cotter pin, flat washer, and wave
washer.
4. Rotate the chute control rod clockwise and
counterclockwise. Make sure the discharge chute
rotates freely.
Figure 3
Lower Chute
Bolt
Nut
Figure 4
Cotter Pin
Flat Washer
Wave Washer
Chute Control Rod
Worm Gear
Discharge
Chute
Notches
Control Rod
Bracket
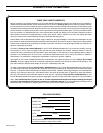
n CHECKLIST
Before you operate your new snow thrower, to ensure that
you receive the best performance and satisfaction from
this quality product, please review the following checklist:
n All assembly instructions have been completed.
n The discharge chute rotates freely.
n No remaining loose parts in carton.
While learning how to use your snow thrower, pay extra
attention to the following important items:
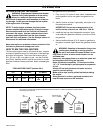
n Make sure the fuel tank is filled with the correct mixture
(50:1 ratio) of gasoline and oil.
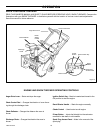
n Become familiar with the location of all controls and un-
derstand their function.
n Before starting the engine, make sure all controls oper-
ate correctly.