


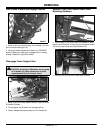

Removing - 10
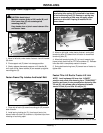
REMOVING
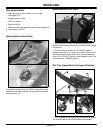
Disengage Belt And Unhook Left Clip Latch
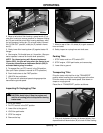
1. Move to right side, under tractor footrest—move belt
tensioning idler lever (A) out of “ENGAGED” position into
“DISENGAGED” position (pointing toward front of tractor).
2. Pull and hold tensioning idler (B) towards right frame
while you remove belt from PTO drive sheave (C).
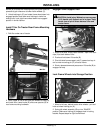
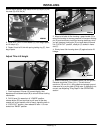
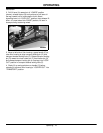
3. Move to left side, under tractor footrest—remove spring
locking pin from clip latch (D) and flip latch of clip reward to
clear tractor mounting pin (E). Install spring locking pins in
clips for storage when finished removing tiller from tractor.
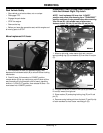
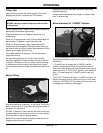
4. Move to left side of tiller housing—grasp handle (E) to
raise tiller housing to align transport locking pin (F) with
locking plate hole (G). Continue to hold tiller housing
stationary while you rotate transport locking pin handle (H)
rearward until spring tension “LOCKS-OUT” pin into
“TRANSPORT” position.
5. Slowly lift housing handle (E) up-and-down to ensure pin
is “LOCKED-OUT” before letting go of handle.
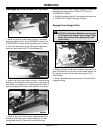
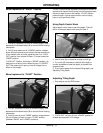
Engage Frame Support Rod
1. Move to left side, under tractor footrest—push and hold
down lift handle (A) as you pivot left-side frame support rod
(B) upward so loop in rod is under mounting pin (C) of
tractor frame.
2. Slowly release downward pressure on lift handle (A) to
engage rod loop.
A
B
C
M96283
M96280
E
D
E
F
H
M96294
G
H
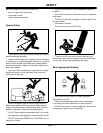
cCAUTION: Avoid injury! Maintain a secure grasp
of lift handle until support rod is in place. Keep
hands clear of pinch areas between tiller and
tractor frame.
M96279
A
C
B