


Jacuzzi
©
Chromatherapy: Installation and Operation Page 4 of 5 GQ99000 • 07-08
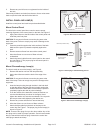
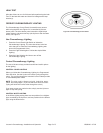
Figure 8. Hole for Chromatherapy Lamp(s)
Lamp
assembly
Inside surface
of bath shell
Retainer
nut
Hole,
1-1/16”
Apply silicone
behind panel
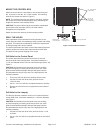
Figure 7. Attach plug to Chromatherapy device
Bath shell (Outisde of bath)
Chromatherapy
lamp or control
panel (Inside of
bath)
Plug from control
panel or lamp
3. Remove any and all burrs or roughness from the inside of
the hole.
Clean away all debris and tools from the area. Use a moist cotton
cloth to wipe the inside and shelf of the bath rim.
INSTALL PANEL AND LAMP(S)
Install the control panel and each lamp as described below.
Mount Control Panel
The hole for the control panel has a notch to ensure proper
mounting alignment of the control panel on the bath, see Figure 6.
1. Apply clear silicone to the back side of the control panel and
insert the panel into place.
Caution: Do not permit silicone to enter the plug area at the
back of the panel. Failure to comply may result in damage to the
equipment.
2. Press the panel fast against the inside surface of the bath.
Make sure the panel is pressed completely against the
shell.
3. Remove excess silicone from around the control panel.
4. Alow the silicone to cure to ten to fteen minutes
undisturbed.
5. Attach the control cable from the control panel to the control
box, see Figure 7. The proper plug for the control panel is
shown in Figure 5.
Mount Chromatherapy Lamp(s)
The hole is ready to mount the lamp(s), see Figure 8.
1. Remove the retainer nut from the lamp assembly.
2. Apply clear silicone around the back of the edge of the
lamp.
Caution: Do not permit silicone to enter the plug area at the
back of the lamp. Failure to comply may result in damage to the
equipment.
3. Insert the lamp housing through the hole in the bath shell
so that the edge of the lamp housing is tightly against the
inside surface of the bath. Make sure the lamp is pressed
completely against the shell to prevent leakage.
4. From the outside of the bath shell, screw the retainer nut
over the threaded body, as shown in the gure. Hand-
tighten the retainer nut onto the lens threads. Do not permit
the lamp to rotate while tightening the retainer nut.
5. Remove any excess silicone from around the lamp.
6. Allow the silicone to cure for ten to fteen minutes.
7. Attach the light cable from the back of the lamp to the
control box see Figure 7. The proper plug for the lamp(s) is
shown in Figure 5.
note: There are four plugs for up to four lamp cables. Any of the
four plugs can be used for proper operation. Jacuzzi recommends
that you start with the left-most plug, closest to the control box
cable plug to attach each lamp.
Figure 6. Mount the Control Panel
Control
panel
Modular
cable
Apply silicone
behind panel
Hole for control panel
(see detail below)