


11
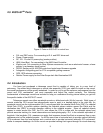
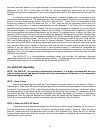
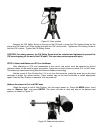
Latitude Adjustment Knob
Lat. Adjust. Lever
Azi. Adjust. Knob
Figure 10. Adjust latitude
Unscrew the Latitude Adjustment Lever from the Latitude Adjustment Knob as shown in Figure 10.
Turn the Latitude Adjustment Knob to set your current latitude, using the Latitude Adjustment Lever for a
fine adjustment, if needed. At this point, with the mount level and pointed North, and the latitude set, the
Polar Axis (R.A. axis) should be pointing very close to the NCP and Polaris.
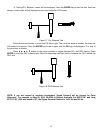
CAUTION: For safety reasons, always adjust the latitude without an OTA and/or counterweights
installed. Also, it is much easier to make this precise adjustment without a load on the axis being
adjusted.
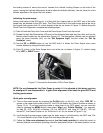
STEP 5. Polar Alignment
As explained in the introduction, an equatorial mount must have an accurate polar axis alignment in
order to track properly. With the iOptron innovative Polar Scope and Quick Polar Alignment procedure, you
can do a fast and accurate polar axis alignment.
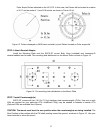
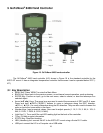
Figure 11. Polar Scope Dial
As indicated in Figure 11, the Polar Scope Dial has been divided into 12 hours along the angular
direction with half-hour tics. There are 2 groups, 6 concentric circles marked from 36’ to 44’ and 60’ to 70’,
respectively. The 36’ to 44’ concentric circles are used for polar alignment in northern hemisphere using
Polaris. While the 60’ to 70’ circles are used for polar alignment in southern hemisphere using Sigma
Octantis.
Polar axis adjustments
Whenever polar axis adjustments are required, loosen the four Azimuth Locking Screws and adjust
the Azimuth Adjustment Knobs to do a fine adjustment of the mount in the azimuth direction. Tighten