


109631_0908 4-5
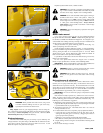
6. Keep oil and grease away from belts.
7. When replacing belts, check pulley groove condition. A worn groove
(notch in shoulder) will cause rapid belt failure. Replace pulley if
groove is worn.
8. Never pry belt over edge of pulley, this may cause fibers of belt to break.
9. Sun and weather injure belts, unnecessary exposure to these elements
should be avoided whenever possible.
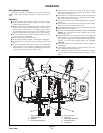
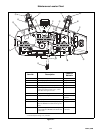
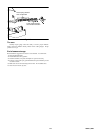
Gauge wheel tension adjustment
Gauge wheel arms are held in place against the gauge wheel arm mount
by lock linkage and lock pin. Tension on arms is controlled by spring wash-
ers. There are 15 washers on each arm: 14 are between the lock linkage and
lock pin and 1 is a spare, placed in front of the lock linkage as shown in Fig.
4-12.
NOTE: Seven of the spring washers are turned one way and the other
seven are reversed. The concave part of the two sets of washers should face
each other. This is what provides the tension. Fig. 7-13
If gauge wheels do not stay firmly in place when handle is in down
(closed) position:
1. Relieve tension on lock pin and linkage by removing handle, lock link-
age and lock pin from gauge wheel arm assembly.
2. Remove cotter pin from lock pin and insert one or two spare washers
between lock linkage and lock pin.
3. Reassemble gauge wheel arm by reversing above directions.
NOTE: If more tension is needed, additional spring washers may be
purchased from your Hustler Dealer.
Handle pin
Set screw
Handle
Lock pin
Spring
Lock
Spare spring washer
Cotter pin
linkage
washers
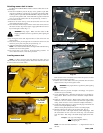
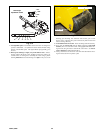
Spring Extension
8.1 - 9.1”
Fig. 4-10
Fig. 4-11
Spring
Chain
Anchor
bracket
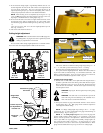
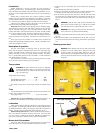
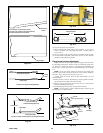
Cutting Edge
Cutting Plane
Cutting Edge
Twisted Blade Edge (Replace)
Straight Blade Edge
End view of blades, comparing twisted and straightened blades.
Fig. 4-9
Warped Blade (Replace)
Straight Edge
Comparison of Warped and Straight Blades
Cutting
Plane
Fig. 4-8
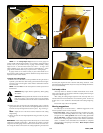
Do not sharpen to original pattern (below)
It is easier to get a straight cutting edge following
the resharpening pattern shown above.
Resharpening
Pattern
Original Edge
Figure 4-7
Fig. 4-12