


4-4 109631_0908
WARNING: When possible clean under mower, using a stick
or similar instrument making sure that no part of the body,
especially arms and hands are under mower.
Daily, inspect mower for grass clipping build-ups, wire and string tan-
gles. Underside of mower housing will collect cut grass and dirt more rapidly
on moist days. Check it frequently when grass is moist. Otherwise, clean
under housing once a day for maximum efficiency.
Blade maintenance
Check the mower blades daily, they are the key to power efficiency and
well groomed turf. Keep them sharp, a dull blade will tear rather than cut the
grass, leaving a brown ragged top on the grass within a few hours. A dull
blade also requires more power from the engine.
Replace any blade which is bent, cracked or broken.
WARNING: Never attempt to straighten a bent blade by heat-
ing, or weld a cracked or broken blade as the blade may break
and cause serious injury. Replace worn or damaged blades.
DANGER: Never work with blades while engine is running or
the PTO Control Lever is in the “ON” position. Always put
PTO Control Lever in “OFF” position, engage parking brake
and turn engine off. Pin mower up when you must work under
it. Wear gloves when handling blades. Always check for
blade damage if mower strikes rock, branch or other foreign
object during mowing!
WARNING: Always wear adequate eye protection when grind-
ing mower blades.
Mower blade removal
Use a 15/16" wrench to remove the 5/8" cap screw holding the blade to
the spindle shaft from underneath. NOTE: A blade holding tool (part num-
ber 381442) is available from Hustler Turf Equipment. It is designed to pre-
vent the blades from rotating when they are being removed or installed on the
spindle. Contact your Hustler dealer for more information.
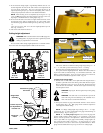
Sharpen the blades on a grinder following pattern as shown (Fig. 4-7).
Touch-up sharpening can be done with a file.
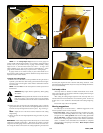
Check the blades for balance following grinding. A commercial balanc-
ing tool is available through most hardware supply stores, or balancing can be
done by placing the blade on an inverted line punch or 1/2" bolt. Blade
should not lean or tilt. Spin the blade slowly, blade should not wobble. If
blade is out of balance, true it up before reinstalling.
Lay the blade on a flat surface and check for distortion (Fig. 4-8 and 4-9).
Replace any distorted blade.
Do not re-use spindle bolts which have stripped, worn or undercut
threads. Torque spindle bolts to 118 ft-lbs. when reinstalling blades.
IMPORTANT: When mounting blades, rotate them after installation to
ensure blade tips do not touch each other or sides of the mower.
WARNING: Failure to correctly torque the bolt may result in
the loss of the blade which can cause serious injury.
WARNING: Mower blades are sharp and can cut. Wrap the
blade(s) or wear gloves and use extra caution when servicing
them.
Belt maintenance & adjustment
The blades in the mower are driven by a V-belt. Belt tension is main-
tained by use of a spring loaded idler pulley. As belt stretches and wears in,
additional tension may become necessary. To increase belt tension, move the
spring chain one (or more) link(s) at the anchor bracket (Fig. 4-10). Installed
spring length should be as shown in Fig. 4-11. When the belt is re-tensioned
each chain link allows approximately .60" (15.2mm) of adjustment.
IMPORTANT: Do not over tension the spring to compensate for a badly
worn belt or pulley.
Belt should be visually inspected every 100 hours for wear and service-
ability. To replace, relieve tension on idler pulley, remove old belt and install
new belt following pattern indicated on maintenance illustration (Fig. 4-1).
Following are some maintenance suggestions:
1. Maintaining proper belt tension gives more economical performance and
longer belt life. Replacement belts may be seriously damaged if machine
is operated before belts are properly adjusted.
2. All V-belts stretch when new. Check belt tension after 1 to 3 hours of
running when belts are new.
3. For better belt life and service, keep belts properly adjusted at all times:
• A loose belt may not slip noticeably, but at the same time it may be
wearing belt and pulley groove excessively. (Sluggish performance is
typical symptom of this problem.)
• If belt slips, excessive heat generated will shorten belt life.
• More belts are ruined by lack of tension than by too much tension.
4. A slight raveling of belt covering does not mean failure. Raveling should
be cut off.
5. Never use belt dressings on V-belts.
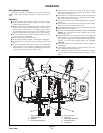
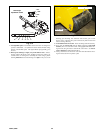
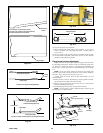
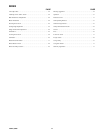
Locking pin -
Storage position
Figure 4-4
Locking pin -
Deck locked position
Figure 4-5
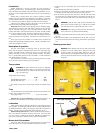
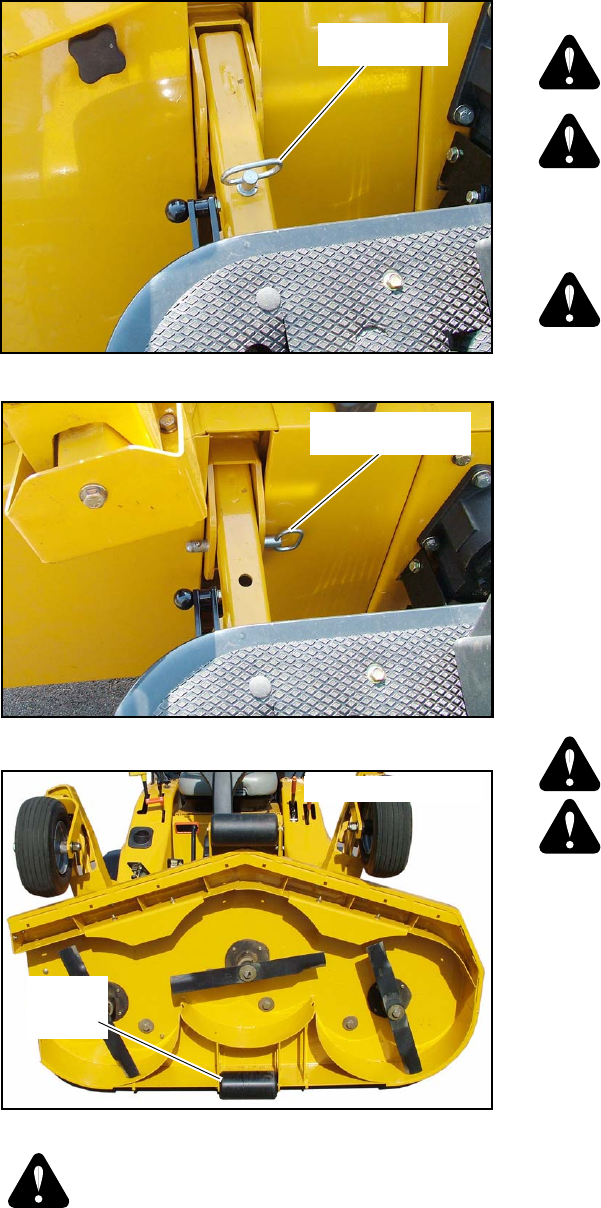
Deck in tilted position
Rear
anti-scalp
roller
Figure 4-6