


English – 39
Assembly 336, 339XP (continued)
WARNING!
The fuel used in the chain saw has the follow-
ing hazardous properties:
• The fluid and its vapour are poisonous.
• Can cause skin irritation.
• Is highly inflammable.
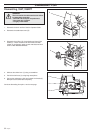
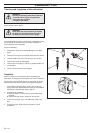
Once the carburettor has been pressure tested assembly
continues as follows:
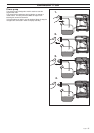
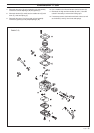
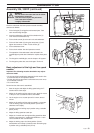
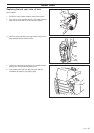
1. Fit the fuel pipe (Z) using pliers with smooth jaws. Take
care not to damage the pipe.
2. Insert the carburettor a little and fit the throttle wire (Y).
Then insert the carburettor fully.
3. Fit the choke control (X) to the tank unit and carburettor.
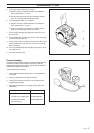
4. Fit the air filter holder (U) using the two screws (V) and
tighten the screws to 1.5 Nm. Fit the air filter (S).
5. Fit the carburettor cover.
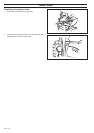
6. Fit the chain and bar. See the Operator’s manual.
7. The operation of the carburettor is also affected if the
manifold pipe or pulse tube is defective. Inspect these parts
too.
8. To change the manifold pipe, see the chapter “AV-system”.
9. To change the pulse tube, see the chapter “Tank unit”.
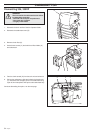
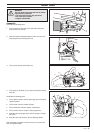
CARBURETTOR
Basic adjustment of the high and low speed
needles
Important! The following must be done before any adjust-
ments are made!
• Fit a bar and chain combination approved for this model. "See
the technical data in the Operator’s Guide".
• Tension the chain so that there is still around 0.2 tum/5 mm to
the underside of the bar.
• Fit a new air filter.
Done when the chain saw is assembled.
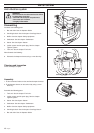
1. Start the engine and adjust the idling speed using the T-
screw until the chain stops.
2. Adjust the H-needle until the engine’s max. speed is 13,000
± 200 rpm. Use a screwdriver with a small blade.
3. Let the engine run at 13,000 rpm until it is warm, about 1
minute.
4. Adjust the H-needle until the engine’s speed is 13,400 rpm.
Turn the locking cap to its richest position. (Screw anti-
clockwise until it stops.)
5. Carefully knock the locking cap in position using a suitable
punch (5 mm).
6. Adjust the idling speed to 2,800 rpm.
7. Adjust the L-needle until the highest idling speed has been
reached, now screw the L-needle anticlockwise a 1/2 turn.
Use a screwdriver with a small blade.
8. Adjust the locking cap to its richest position. (Screw
anticlockwise until it stops.) Carefully knock the locking cap
in position using a suitable punch (5 mm).
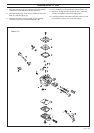
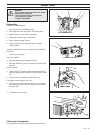
S
V
VU
Z
X
Y
L
H
T