


English-22
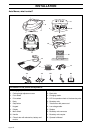
INSTALLATION
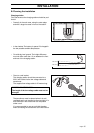
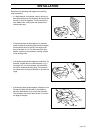
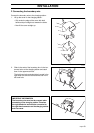
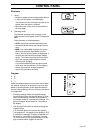
D. Charging the battery
The Auto Mower is supplied with an uncharged battery.
As soon as the charging station is connected, it is pos-
sible to charge the mower.
1. Place the Auto Mower in the charging station to
charge battery while you are laying the boundary
wire.
Charging starts irrespective of the position of the
main switch.
From an uncharged state the battery takes about
1 1/2 to 2 1/2 hours until it is fully charged.
If the Auto Mower leaves the charging station
before the boundary wire is connected, the mower
will stop in front of the charging station and show
the fault message ”No loop signal”. This message
automatic clears once the boundary wire is con-
nected.
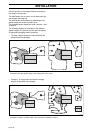
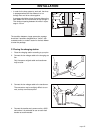
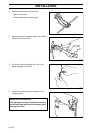
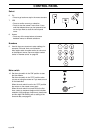
E. Laying out the boundary wire
1. Lay the boundary wire according to your plan, but
wait with the connection to the charging station.
Lay the cable by either:
• Securing the cable to the ground with staples.
After a few weeks the grass roots will have
grown over the cable so it is not visible.
It is important to secure the staples close
together. The boundary wire must generally lie
close to the ground so as not to be cut off before
the grass roots have grown over it.
If you intend to install more than one Auto Mower
in the same garden the different installations’
boundary wires can be laid edge to edge with
each other.
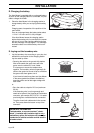
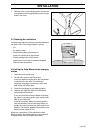
or:
• Bury the cable at a depth of 2-5 cm (maximum
20 cm).
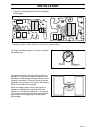
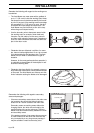
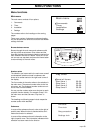
If the boundary wire is not long enough and
needs to be spliced: Use Husqvarna’s solderless
connector, part number 535 13 37-01. It is water-
proof and gives a reliable electrical connection.
To splice: Insert both cable ends in the connec-
tor. Then press down the button on top of the
connector.
3012-238
3012-221
3012-304
3012-305
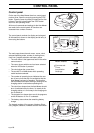
IMPORTANT INFORMATION
Twisted cables, or a screw terminal (”chock-
block”), insulated with insulation tape is not a
satisfactory splice. Soil moisture will cause the
conductors to oxidise and after a while result in
a broken circuit.