


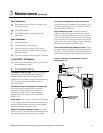

4 Programming and Advanced Features continued
Programming sample mode variables:
The sample mode variables are Sample, Measure
and Clear as described above. The following
procedure will change the Sample variable.
To Enter SAMP / MEAS / CLEAR Mode
1) Push power button to turn unit on. Wait for
power up sequence to finish (30 seconds).
2) Push and hold the unnamed button (second
from left) first, then Push and hold the Menu
button. Hold both buttons until the screen goes
blank (two seconds). Release both buttons and
the unit is now in Programming Mode.
3) Push the MORE button.
4) Push the SMPL (sample) button and the unit is
now in the SAMP / MEAS / CLEAR mode.
SAMP Variable
5) Push SAMP (sample) button.
6) Push INC button (increase) or DEC button
(decrease) until the display matches the desired
value. The display is in minutes and seconds.
7) Push SAVE button to store new SAMP variable.
To Exit SAMP / MEAS / CLEAR Mode
8) Push DONE button twice slowly to get back into
normal operation mode.
The Measure and Clear variables are pro-
grammed in the same manner, except for step
five above in which you would push the MEAS
or CLEAR button.
D Data Logging
The Manning EC-P2 can log periodic gas concentra-
tion readings to be downloaded to a file which can be
read by Microsoft Excel or other popular spreadsheet
applications. The EC-P2 will store instantaneous gas
values every one, five, 10, or 15 minutes. Multiple
sessions can be logged and then downloaded as
separate files.
EC-P2 software installation:
The Manning EC-P2 is supplied with a CD containing the
“Manning
EC-P2” program. It will run on Windows 95,
Windows 98, or Windows 2000. To install the program,
place the disk in your CD drive. The CD should
automatically begin the installation process. Follow the
prompts as they appear on your screen. Accepting the
default directory locations is recommended for most
installations. If the CD does not automatically start,
click on “My Computer” and then your CD drive.
Double-click on the file named “Setup.exe.”
Prior to your first datalogging session it is recom-
mended that you connect the Manning EC-P2 to your
computer with the data logging program running.
The computer can then set the time in the EC-P2 to
match its own clock.
Data Logging with the Manning EC-P2:
To Start the Data Logging Session
1) Push power button to turn unit on. Wait for
power up sequence to finish (30 seconds).
2) Push the MENU button.
3) Push the LOG button and the unit is now in the
CLEAR / INT / START mode.
4) If the CLEAR button is available, that means
there is data currently stored in the unit. If
desired, you can erase the data already in the
unit by pushing the CLEAR button. (If you don’t
push CLEAR, each data logging session can be
downloaded as a separate file).
5) Push INT button (interval) to cycle through the
choices for how often to log a data point. Stop
when the desired interval is displayed. Notice
how much time can be covered with the
remaining free memory.
6) Push and hold the START button until the screen
goes blank (two seconds) to begin a new data
logging session. The unit will now display the gas
concentration. The Lg symbol in the left side of the
display indicates that the unit is logging data. If
you watch this symbol carefully, you will see it
change to an “s” each time a data point is stored.
Manning EC-P2 Sensor 19546 ECP2 07/09 REVG Copyright © 2009 Honeywell Analytics. All Rights Reserved. 13