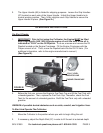
SKU 91959 For technical questions please call 1-800-444-3353 PAGE 10
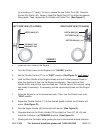
(to a maximum 11” deep). To do so, remove the two Cotter Pins (39). Remove
the two Pin Shafts (38). Raise or lower the Depth Skid (57) to obtain the desired
tilling depth. Then, replace the Pin Shafts and Cotter Pins. (See Figure C.)
6. Hold the Start Handle of the Engine loosely and pull it slowly several times to
allow the gasoline to flow into the Engine’s carburetor. Then hold the Start
Handle firmly and pull the rope hard and fast. Pull the rope all the way out, using
two hands if necessary. If necessary, pull the rope several times until the Engine
starts.
7. Allow the Engine to run for several seconds. Then, turn the Choke Lever to its
“RUN” position.
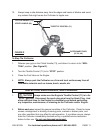
8. Adjust the Throttle Control (71) to the desired speed at which the Cultivator will
move. (See Figure D.)
9. Grip the Upper Handle (66)
firmly
with both hands. (See Figure D.)
3. Open the Fuel Valve on the Engine.
4. Turn the Choke Lever on the Engine to its “CHOKE” position.
5. Set the Throttle Control (71) to its “FAST” position. (See Figure D, next page.)
COTTER PIN (39)
COTTER PIN (39)
PIN SHAFT (38)
PIN SHAFT (38)
DEPTH SKID (57)
DEPTH SKID (57)
LEFT SIDE VIEW (TO LOWER) RIGHT SIDE VIEW (TO RAISE)
FIGURE C
10. Squeeze down on the Clutch Handle (73) to rotate the Tines (37, 50, 40) and
move the Cultivator in a FORWARD direction. (See Figure D.)
11. Slowly push the Cultivator while guiding the tool in the desired forward direction.


