


17
SLIP CLUTCH
To adjust the slip clutch:
1. Remove the attachment and lower the rear of the
tractor to the ground.
2. Carefully clean the front of the transmission.
3. Remove the quick hitch studs from the
transmission.
4. Remove the quick hitch PTO assembly and PTO
brake assembly.
NOTE: The attachment gasket must be replaced if
damaged.
5. Remove the dog and trunnion block.
6. Disconnect the wiring harness from the PTO
brake interlock switch.
7. Remove the shifter parts.
8. Slide the shipper shaft assembly through the top
of the advance casting.
9. Slide the clutch assembly and pinion shaft out of
the transmission.
10. Remove the retaining ring and slide the clutch
assembly off of the pinion shaft.
11. Turn all of the jam nuts counterclockwise to
loosen.
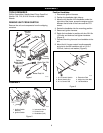
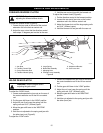
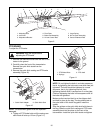
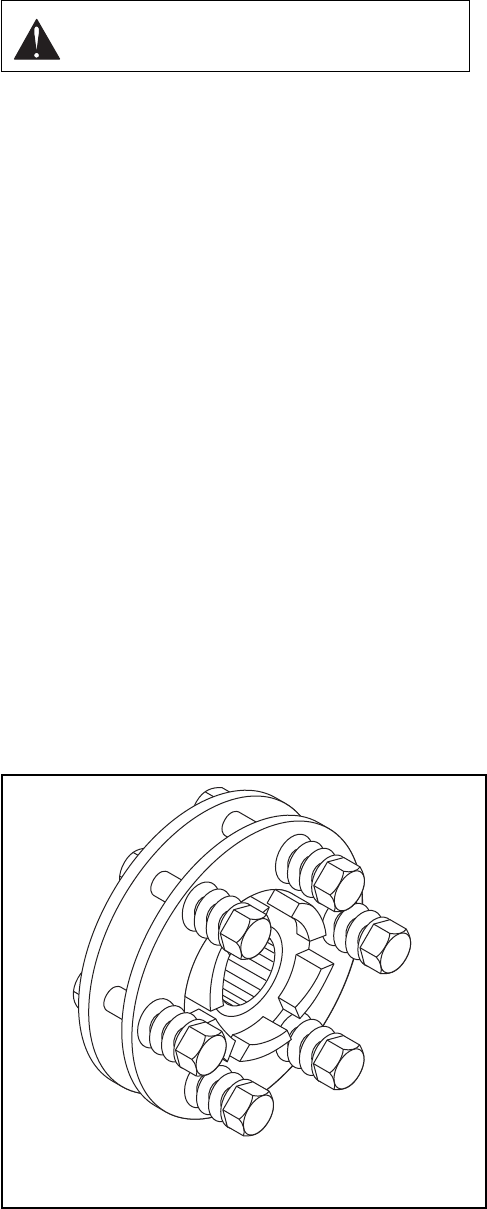
12. Torque bolts to 70 in. lbs. in two stages. First
tighten bolts to 20 in. lbs. in pattern shown
(Figure 12). Then tighten to 70 in. lbs. in same
pattern.
NOTE: Do not tighten the bolts in a circular sequence,
that is, by tightening the bolt next to one which was just
tightened. The bolts should be tightened in a cross
sequence, that is, by tightening one bolt, then
tightening the bolt which is across from it on the plate.
Continue tightening the bolts in this sequence until all
the bolts are tightened. (Figure 12)
13. Slide the clutch assembly back onto the pinion
shaft.
14. Install the retaining ring and slide the pinion shaft
completely into the transmission.
15. Reinstall the shipper shaft and other parts that
were removed. Make sure the trunnion block is on
the shipper shaft and held in place by the dog.
The dog should rest on the spiral teeth of the
clutch dog plate.
16. Install the gasket.
17. Align the splines on the quick hitch shaft with
those in the dog.
18. Slide the quick hitch casting and PTO brake
assembly back into place on the front of the
transmission.
19. Install the quick hitch studs and tighten.
STEERING BRAKE ADJUSTMENT
(OPTIONAL):
1. Park the tractor in a level area.
2. Put the parking brake handle in the “OFF” (down)
position.
3. Loosen the jam nuts on the right and left brake
rod assemblies (Figure 8)(Figure 9).
4. Turn the adjusting nuts until the brake handle
cross bar is parallel with the instrument panel.
(See Controls and Features.)
5. Move the brake handlebar all the way to the right
and measure the distance from the right end
edge of the brake handle cross bar to the right
side of the instrument panel.
6. Move the brake handlebar all the way to the left
and make the same measurement on the left.
7. Adjust the nuts until the difference between the
two measurements is 1/2” to 3/4” (13 to 19mm).
8. Turn both adjusting nuts the same amount,
clockwise to increase the measurement
difference or counterclockwise to decrease the
measurement difference.
9. Tighten the jam nuts.
10. Loosen the jam nuts below the compression
spring on the right side of the tractor and adjust
until one has the desired tension for the right
brake.
11. Tighten the jam nuts.
WARNING: Stop the engine before
adjusting the slip clutch.
1
2
3
4
5
6
Figure 12