


5 -16
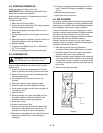
5.2 CHECKING ENGINE OIL
Check the engine oil daily prior to use.
IMPORTANT:
Never operate the engine with the oil
below the low mark on the dipstick.
See the engine manual for oil specifications and oil
filter service instructions.
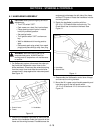
To check oil level:
1. Move the unit to level location.
2. Clean around the dipstick and filler tube to prevent
dirt from entering the engine.
3. Remove the dipstick and wipe off the oil on the
depth stick.
4. Put the dipstick back into the engine, and remove
again.
5. When the dipstick is removed, note the oil level. Oil
should be between the full and add mark.
6. Replace dipstick.
7. If required, add 5W30 below 40
o
or 30W above
40
o
. Do not overfill.
8. Clean up any spillage that may have occurred.
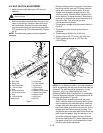
5.3 CHANGING OIL
Engine muffler and other parts will be hot if unit has
been running.
1. Engine oil should be changed after the first five
hours of operation and every 25 hours there after.
2. Move the unit to a level, well ventilated area and
set the parking brake.
3. If the engine is cold, let the unit run for five
minutes.
4. When the engine is warm, stop the engine.
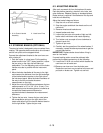
5. Clean the area around the dipstick and drain.
6. Put an open container that will hold one gallon of
oil under the drain.
7. Open the drain.
8. Allow the engine oil to drain completely into the
one gallon container. Remove container and
contents for future recycling as required.
9. Close the oil drain.
10.If used; remove the oil filter.
11.Clean the oil filter port and install a new oil filter
according to the instructions on the oil filter. Fill
with new oil to the "full" mark on the dipstick.
12.Start and run the engine for one minute. Stop the
engine and recheck the oil level and add as
necessary.
13.Check for leakage at the drain plug and oil filter if
used. Tighten the fittings as necessary if leakage
occurs.
14.Release the parking brake.
15.Return the unit into service.
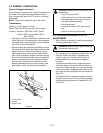
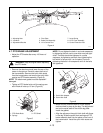
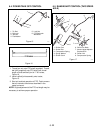
5.4 AIR CLEANER
Dry type air cleaner elements should be replaced after
100 to 200 hours if engine is normally operated under
good clean air conditions. Service and replace element
more frequently under dusty or dirty conditions.
To clean the element remove and tap lightly on a flat
surface to remove loose surface dirt. Replace element
if dirt does not drop off easily. Do not wash or dry
elements in any liquid or attempt to blow dirt off with air
hose as this will puncture the filter element.
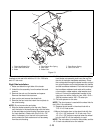
Carefully handle new element. Do not use if gasket
surfaces are bent or twisted. Check the following when
installing new element (Figure 9).
1. Back plate must be securely tightened to
carburetor. Replace back plate if bent or cracked.
2. Gasket surfaces of element must be flat against
back plate and cover to seal effectively.
3. Washer must be in place between cover and wing
nut to seal and prevent unfiltered air from entering
through hole in cover. If washer is not used, make
sure wing nut (special) properly seals area around
cover hole.
4. Wing nut must be finger tight.
WARNING:
Do NOT touch parts which are
hot. Allow parts to cool before servicing.
Figure 9