


Maintenance
34 Owner’s Manual for Stationary Diesel Generators
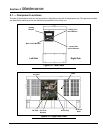
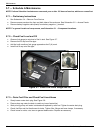
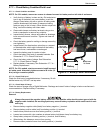
5.7.5— Check Radiator for Clogging
Direct beam of flashlight through openings in fan guard to inspect the radiator fins. Carefully look for debris, accumula-
tions of dirt or other deposits. If necessary, clean as follows:
1. On right side of enclosure, loosen two clamps at each end of turbocharger exhaust outlet pipe. Remove pipe,
clamps and rubber couplings from engine.
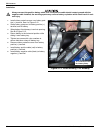
2. Remove oil drain hose from holding clamp.
3. Remove four screws with nylon washers to release fan guard from radiator shroud.
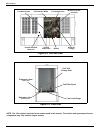
4. On left side of enclosure, loosen two clamps at each end of air intake pipe. Remove pipe, clamps and rubber
couplings from engine.
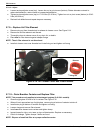
5. Remove coolant hoses from holding clamps.
6. Remove four screws with nylon washers to release fan guard from radiator shroud.
7. Carefully remove any debris from radiator fins. Use warm soapy water and a soft bristled brush to remove dirt
and other deposits, if necessary.
8. On left side of enclosure, install four screws with nylon washers to fasten fan guard to radiator shroud.
9. Install coolant hoses into holding clamps.
10. Install clamps and rubber couplings onto each end of air intake pipe. Install pipe to air heater and radiator shroud.
Tighten clamps.
11. On right side of enclosure, install four screws with nylon washers to fasten fan guard to radiator shroud.
12. Install oil drain hose into holding clamp.
13. Install clamps and rubber couplings onto each end of turbocharger exhaust outlet pipe. Install pipe to turbo-
charger outlet and radiator shroud. Tighten clamps.
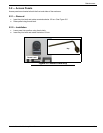
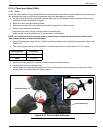
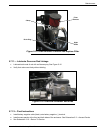
5.7.6— Check Lubricating Oil Level
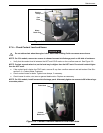
1. Remove dipstick and wipe with a clean cloth. See A of Figure 5-10.
2. Completely insert the dipstick and then remove it.
3. Verify that the oil level is at or near the H(igh) mark.
NOTE: Each hash mark or line below the H(igh) mark represents one liter. Add oil whenever the level is one
liter or more below the H(igh) mark.
4. If necessary, remove the oil fill cap and slowly add oil until the level is at the H(igh) mark. See B of Figure 5-10.
DO NOT OVERFILL.
5. Install dipstick and oil fill cap.
6. Check oil drain hose for leaks. Check hose for nicks, cuts, tears or general deterioration. Replace as necessary.
Figure 5-10. Oil Level Dipstick
A
3.4 Liter
2.4 Liter
2.3 Liter
B