


RAPTOR
•
19
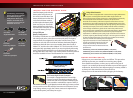
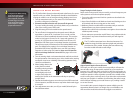
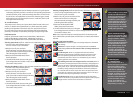
2. The wheels have small holes molded in to allow air to enter and exit the tire
during normal running. Water will enter these holes and get trapped inside the
tires if holes are not cut in the tires. Cut two small holes (3mm or 1/8” diameter) in
each tire. Each hole should be near the tire centerline, 180 degrees apart.
3. Confirm that the receiver box O-ring and cover are installed correctly and secure.
Make sure the screws are tight and the blue O-ring is not visible protruding from
the edge of the cover.
4. Confirm that your batteries can be used in wet conditions.
5. Use lower gearing (smaller pinion gears, as low as 12T or spur gear as large as
90T) when running in mud, deep puddles, snow, or other similar situations that
will restrict the tires and put much higher loads on the motor.
Motor Precautions
• Titan motor life can be greatly reduced in mud and water. If the motor gets
excessively wet or submerged, use very light throttle (run the motor slowly) until
the excess water can run out. Applying full throttle to a motor full of water can
cause rapid motor failure. Your driving habits will determine motor life with a wet
motor. Do not submerge the motor under water.
• Do not gear the motor by temperature when running in wet conditions. The
motor will be cooled by water contact and will not give an accurate indication of
appropriate gearing.
•
Use special care when operating your model in muddy conditions. Stop operating your
model if it appears to be straining due to the tackiness of the mud or build-up of mud
on the chassis. Do not allow mud to collect on the motor or pack around the motor.
After Running Your Vehicle in Wet Conditions
1.
Drain the tires by spinning the tires at high speed to “sling” the water out. One way
to do this is to make several high-speed passes on a flat, dry surface, if possible.
2. Remove the batteries.
3. Rinse excess dirt and mud off the truck with low-pressure water, such as from a
garden hose. Do NOT use a pressure washer or other high-pressure water. Avoid
directing water into the bearings, transmission, etc.
4. Blow off the truck with compressed air (optional, but recommended). Wear safety
glasses when using compressed air.
5. Remove the wheels from the truck.
6. Spray all the bearings, drivetrain, and fasteners with WD-40
®
or similar water-
displacing light oil.
7. Let the truck stand or you may blow off with compressed air. Placing the truck
in a warm, sunny spot will aid drying. Trapped water and oil will continue to drip
from the truck for a few hours. Place it on a towel or piece of cardboard to protect
the surface underneath.
8. As a precautionary step, remove the sealed receiver box cover. While unlikely,
humidity or tiny amounts of moisture or condensation may enter the receiver
box during wet running. This can cause long-term problems with the sensitive
electronics in the receiver. Removing the receiver box cover during storage
allows the air inside to dry. This step can improve the long-term reliability of the
receiver. It is not necessary to remove the receiver or unplug any of the wires.
9. Additional Maintenance: Increase your frequency of disassembly, inspection,
and lubrication of the following items. This is necessary after extended wet use or
if the vehicle will not be used for an extended period of time (such as a week or
longer). This additional maintenance is needed to prevent any trapped moisture
from corroding internal steel components.
• Stub axle housing bearings: Remove, clean, and re-oil the bearings.
• Transmission: Remove, disassemble, clean, and re-grease the transmission
components. Use a light coating of wheel bearing grease (from an auto parts
store) on the metal gear teeth. Refer to your exploded view diagrams for help
with disassembly and reassembly.
• Titan motor: Remove the motor, clean with aerosol motor cleaner, and re-oil
the bushings with lightweight motor oil. Be sure to wear eye protection when
using spray aerosol cleaners.
RECEIVER BOX: MAINTAINING A WATERTIGHT SEAL
Removing and Installing Radio Gear
The unique design of the receiver box allows the removal and installation of the
receiver without losing the ability to maintain a watertight seal in the box. The
patent-pending wire clamp feature gives you the ability to also install aftermarket
radio systems and maintain the watertight features of the receiver box.
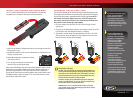
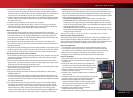
Removing the Receiver
1. To remove the cover, remove the two 3x8mm button-head cap screws.
2. To remove the receiver from the box, simply lift it out and set to the side.
The antenna wire is still inside the clamp area and cannot be removed yet.
3. Remove the wire clamp by removing the two 2.5x8mm cap screws.
4. Unplug the servo cables from the receiver and remove the receiver.
Receiver Installation
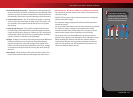
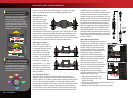
1. Always install the wires into the receiver box before installing the receiver.
2. Install the antenna wire and the servo cables into the
receiver box.
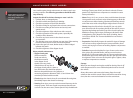
3.
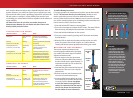
Arrange the wires neatly using the wire guides in the
receiver box (A). The excess wire will be bundled inside
the receiver box. Label which wire is for which channel.
4. Apply a small bead of silicone grease (Traxxas part
#1647) to the wire clamp (B).
5. Install the wire clamp and tighten the two 2.5x8mm cap
screws securely.
6.
Install the receiver into the box and plug the wires into the
receiver (C). Refer to page 10 for the wiring diagram.
7. Make sure the box light pipe is aligned with the
receiver LED. Make sure the O-ring is properly seated
into the groove in the receiver box so that the cover
will not pinch it or damage it in any way.
8. Install the cover and tighten the two 3x8mm
button-head cap screws securely.
9. Inspect the cover to make sure that the O-ring seal is not visible.
A
B
C
DRIVING YOUR MODEL