


16
•
RAPTOR
ADJUSTING THE ELECTRONIC SPEED CONTROL
The XL-5 electronic speed control is equipped with built-in Low-Voltage
Detection. The Low-Voltage Detection circuitry constantly monitors the
battery voltage. When the battery voltage begins to reach the minimum
recommended discharge voltage threshold for LiPo battery packs, the XL-5 will
limit the power output to 50% throttle. When the battery voltage attempts to
fall below the minimum threshold, the XL-5 will shut down all motor output.
The LED on the speed control will slowly blink red, indicating a low-voltage
shutdown. The XL-5 will stay in this mode until a fully charged battery is
connected.
Your model includes a Power Cell NiMH battery. The XL-5 speed control’s Low-
Voltage Detection has been disabled for best performance with this battery.
The speed control’s LED will glow red when it is turned on, indicating Low-
Voltage Detection is disabled. Be certain to activate Low-Voltage Detection if
you install LiPo batteries in your model. Never use LiPo batteries while Low-
Voltage Detection is disabled.
Verify that Low-Voltage Detection is DISABLED:
1. Turn on the transmitter (with the throttle at neutral).
2. Connect a fully charged battery pack to the XL-5.
3. Press and release the EZ-Set button to turn the XL-5 on. If the LED is
solid red, then the Low-Voltage Detection is DISABLED (not safe to use
LiPo batteries). If the LED is solid green, then Low-Voltage Detection is
ACTIVATED.
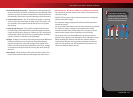
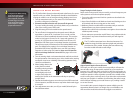
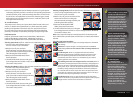
To activate Low-Voltage Detection (LiPo setting):
1. Make sure the LED on the XL-5 is on and RED.
2. Press and hold the EZ-Set button (the LED will
turn off) (A). After ten seconds, the motor will beep twice and the LED will
shine GREEN. Release the button (B).
3. Low-Voltage Detection is now ACTIVATED.
To disable Low-Voltage Detection (NiMH setting):
1. Make sure the LED on the XL-5 is on and GREEN.
2. Press and hold the EZ-Set button (the LED will
turn off) (A). After ten seconds, the motor will beep three times and the LED
will shine RED. Release the button (B).
3. Low-Voltage Detection is now DISABLED.
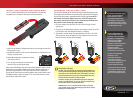
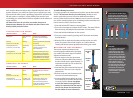
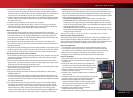
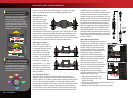
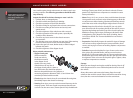
XL-5 Setup Programming (Calibrating your ESC and transmitter)
Read through all of the programming steps before you begin. If you get lost
during programming or receive unexpected results, simply unplug the battery,
wait a few seconds, plug the battery pack in, and start over.
1. Disconnect one of the motor wires between the XL-5 and the motor. This is a
precaution to prevent runaway when the speed control is turned on before
it is programmed.
2. Connect a fully charged battery pack to the XL-5.
3. Turn on the transmitter (with the throttle at neutral).
4. Press and hold the EZ-Set button (A). The LED will first turn
green and then red. Release the button.
5. When the LED blinks RED ONCE, pull the
throttle trigger to the full throttle position and
hold it there (B).
6. When the LED blinks RED TWICE, push the
throttle trigger to the full reverse and hold it
there (C).
7. When the LED blinks GREEN ONCE,
programming is complete. The LED will then
shine green or red (depending on Low-
Voltage Detection setting), indicating the XL-5
is on and at neutral (D).
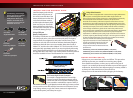
XL-5 Operation
To operate the speed control and test the programming,
reconnect the motor wires and place the vehicle on a stable
block or stand so that all of the drive wheels are off the ground.
Note that in steps 1-8 below, Low-Voltage Detection is DISABLED (factory default)
and the LED shines red. If Low-Voltage Detection is ACTIVATED, the LED will shine
green instead of red in steps 1-8 below. Never use LiPo batteries while Low-
Voltage Detection is disabled.
1. With the transmitter on, press and release the EZ-Set button. The LED will
shine RED. This turns the XL-5 on. If you press and release too quickly, you
may hear the steering servo jump but the LED may not stay on. Simply
press the button again until the LED shines RED and then release.
2. Apply forward throttle. The LED will turn off until full throttle power is
reached. At full throttle, the LED will shine RED.
3. Move the trigger forward to apply the brakes. Note that braking control is
fully proportional. The LED will turn off until full braking power is reached.
At full brakes, the LED will shine RED.
4. Return the throttle trigger to neutral. The LED will shine RED.
5. Move the throttle trigger forward again to engage reverse (Profile #1). The
LED will turn off. Once full reverse power is reached, the LED will shine RED.
6. To stop, return the throttle trigger to neutral. Note that there is no
programmed delay when changing from reverse to forward. Use caution
to avoid slamming the speed control from reverse to forward. On high-
traction surfaces, this could result in transmission or driveline damage.
7. To turn the XL-5 off, press and hold the EZ-Set button for 1½ seconds or until
the red LED turns off.
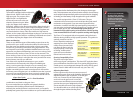
XL-5 Specifications
Input Voltage
4-8 cells NiMH; 2S LiPo
Case Size
1.23”W x 2.18”L x 0.61” H
Weight
(2.79 Ounces / 3.03 Ounces)
Motor Limit
15-turns (540 Size) /
12-turns (550 Size)
On Resistance Forward
0.007 Ohms
On Resistance Reverse
0.014 Ohms
Peak Current - Forward
100A
Peak Current - Reverse
60A
Braking Current
60A
Continuous Current
14A
BEC Voltage
6.0 VDC
BEC Current
1A
Power Wire
14 Gauge / 5”
Input Harness Wire
26 Gauge / 9”
Transistor Type
MOSFET
PWM Frequency
1600 Hz
Thermal Protection
Thermal Shutdown
Single Button Setup
Yes
Low-Voltage Detection
Yes (User Enabled)
A
A
B
B
A
Green then Red
B
Once Red
C
Twice Red
D
Solid