


- 17 -
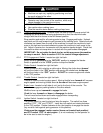
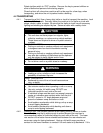
FIGURE 4 FIGURE 5
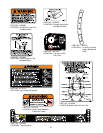
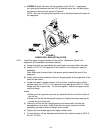
CONTROL ARM SHAFT LEVER ALIGNMENT
b) If the ends of the levers hit against each other, while in the drive position
(levers rotated in as far as possible), make adjustments by moving the levers
outwards to the neutral lock position and carefully bend them outward. Move
them back to the drive position and check for clearance, repeat if necessary.
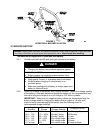
3.6 POSITION DISCHARGE CHUTE.
Loosen two (2) 5/16” nyloc nuts attaching discharge chute. Lower the discharge chute
into position. Retighten nyloc nuts until chute is snug but can pivot freely.
3.7 SERVICE ENGINE.
Engine is shipped with oil; check oil level and if necessary and fill to the appropriate
level with oil as specified in Engine Owner’s Manual.
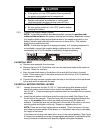
3.8 SERVICE HYDRAULIC OIL
The machine is shipped with hydraulic oil in the reservoir. Run the machine for
approximately 15 minutes to allow any extra air to purge out of the hydraulic system.
Check hydraulic reservoir and if necessary fill the reservoir to the appropriate level with
Mobil 1 15W-50 synthetic motor oil. Replace hydraulic reservoir cap and tighten until
snug. DO NOT overtighten.
NOTE: The baffle has two levels. The upper level represents the “HOT” level and the
lower level represents the “COLD” level. The oil level varies with the temperature of the
oil. The “HOT” level shows the level of oil when it is a 225°F (107°C). The “COLD” level
shows the level of the oil when it is at 75°F (24°C). Fill to the appropriate level depending
upon the temperature of the oil. For example: If the oil is about 150°F (65°C), fill to
halfway between the “HOT” and “COLD” levels. If the oil is at room temperature (about
75°F (24°C)), fill only to the “COLD” level.
3.9 CHECK TIRE PRESSURE.
Check tire pressure in drive tires. Proper inflation pressure for the drive tires is 10 psi
(90 kPa). Adjust if necessary. Semi-Pneumatic Caster tires (without a valve stem) do
not need to be inflated.
NOTE: Perform the following steps if the unit is to be driven off of the crate.
a) Remove the crating strap from the rear of the unit.
b) Inflate the rear drive tires to approximately 25 psi to lift the frame of the unit off the
rear crating brackets.
c) Read Section 4 (Operation Instructions) before driving the unit off the crate bottom.
d) After removing the unit from the crate, re-set the air pressure in the drive tires to 10
psi.
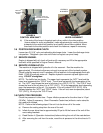
LEVERS IN
ALIGNMENT
MOUNT PLATE TO
THE REAR & OUTSIDE
OF ARM SHAFT
MOTION
CONTROL
LEVER