


6
A&E CATALINA 2500
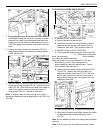
C. Tighten lock knob on arm assembly.
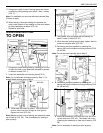
5. Using wand, hook pull-strap and pull awning out by
unrolling the fabric (FIGS. 5A and 5B).
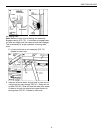
FULL EXTENSION
During operation for fully extended awning, fabric can
be rolled out and rafter lock buttons will automatically
snap into place to lock awning in full extension. Listen
for Click of rafter lock buttons and continue to pull on
pull-strap to make sure that rafter locks are fully set
before releasing pull-strap. Tighten lock knobs (FIG.
5C).
PARTIAL EXTENSION
For partially extended awning operation, roll fabric out
to desired extension and while firmly grasping pull-strap
tighten rafter lock knobs (FIG. 5D).
Note: Make sure that rafter lock knobs are tightened before
releasing pull-strap.
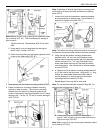
FOR PATIO POSITION
6. Place arm assembly in a vertical position and adjust
height (FIG. 6).
7. Drive in the supplied spikes through awning foot to
secure arm to ground (FIG. 7). Repeat for other side.
The Catalina 2500 Awning is now ready for you to enjoy.
8. Rain Release Setting: To avoid damage to the awning
due to rain water collecting on the canopy, simply lower
one of the arms enough to let the water drain from that
side (FIG. 8).
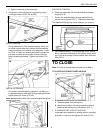
TO CLOSE
Note: To close on curved sided vehicles skip to Step 6.
TO CLOSE ON STRAIGHT SIDED VEHICLE
1. IF AWNING IS SET IN PATIO POSITION:
A. Remove spikes from awning foot.
B. Attach foot to bottom mounting bracket on side of
vehicle to set awning into pivot position (FIG. 1).
2. IF AWNING IS SET IN PIVOT POSITION:
Lower each arm assembly to closing position indicated
by arrow on inner arm and tighten lock knob (FIG. 2).