


28
F. Deck leveling Procedure
1. Park the mower on a flat paved surface, engage
the parking brake, shut off the engine, remove
the key from the ignition switch, disconnect the
spark plug wires and using the foot pedal, lower
the mowing deck into the 3" height of cut posi
-
tion. (The 3" height of cut position is recom-
mended in order for one to see and obtain a
measurement. Any height of cut position is
acceptable as long as a proper measurement
can be taken.)
2. Check the right and left front tire pressure.
Adjust as necessary to 20-25 psi. Tire pressure
can affect blade height by as much as a 1/4”.
3. Check the right and left rear Drive tire pressure.
Adjust as necessary to 8-10 psi.
4. Measure blade-to-ground height at the front tip
of the right blade. To obtain an accurate mea
-
sure, align blades in parallel with mower center-
line, (i.e. front to back).
5. Measure blade-to-ground height at the front tip
of the left blade. Be sure to measure at the
blade tip with the blades arranged in proper
position.
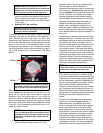
6. To level the deck,(side to side), place the deck in
the (3” suggested) cutting position. With a 3/4”
wrench loosen the lower jam nut of the left side
of the Lift Link. To adjust the side of the deck up
or down turn the upper jam nut clockwise (to
raise) or counter clockwise (to lower) a few
turns.
7. Measure the blade-to-ground height at the right
rear blade tip. Again be sure to measure at the
blade tip at the rear of the right blade when
aligned along the mower centerline. The blade-
to-ground height at the rear of the blade tip
should be 1/8" to 1/4”
(1/8” for 1-1/2” and 1/16”
for 1”)
higher than the front tip. This is referred to
as blade pitch. The same height difference
should be true for the left blade, measured front
and back.
8. To change the pitch (front to rear), loosen the
lower nuts on the rear Lift Links. With a few
turns, adjust clockwise (to raise) or counter
clockwise (to lower) the upper nuts of the rear
Lift Links. Once the deck is adjusted, retighten
lower nuts.
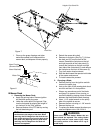
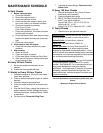
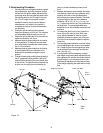
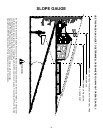
9. The final adjustment would be to set the Trailing
Link by adjusting the jam nuts on the threaded
link. Loosen the jam nuts and tighten the inner
nut to achieve the correct length and belt ten
-
sion. (see Fig. 13).
10. In many cases it will be necessary to adjust
deck height using both eyebolt adjustments and
pitch adjustment to achieve the correct blade-to-
ground heights. If you remember that the front
right blade tip adjustment is fixed and you level
to that height, adjusting the decks will be simpli
-
fied.
Height of Cut LInk
Figure. 13
Trailing Link
Front
of Unit
inner Jam Nuts
Right
Side
Outer Jam Nuts
Left Side
Adjustable Lift Link
jam nut
jam nut