


18
3. Sharpening a Blade.
a. Set the parking brake.
b. Clean any debris from the blades. Keep
blades sharp and free of build up at all
times.
c. Sharpen blades evenly at the original 30°
angle to maintain balanced cutting blades.
Do not sharpen the underside of the
blades. Use a electric blade sharpener, a
conventional electric grinder or a hand file
to sharpen the blades.
d. Replace any blade with severe nicks or
dents that cannot be removed by filing.
e. Check the balance of the blade after
sharpening by placing it on a blade bal
-
ancer. Do not use un-balanced blades.
f. If the blade dips on one end, file stock off
of the cutting surface on that end.
Note: Blades that cannot be easily bal-
anced—REPLACE.
4. Changing the Blade Drive Belts:
a. Set the parking brake. Remove ignition key
and both spark plug caps.
b. Unscrew the wing nuts from the deck cov-
ers and remove both covers.
c. Using a 1/2" socket breaker bar or socket
rachet insert the male end into the 1/2"
opening in the lower idler arm assembly
and pull the idler arm clockwise. While
holding the idler arm back, loosen the
blade drive belt from the pulley and slide
the belt away from the pulley.
d. Remove tension of the PTO belt by moving
the belt tensioning rod. Loosen the belt
retaining bolt.
e. Pull the tensioner pulley away from the belt
and remove the PTO belt then remove the
blade drive belt.
f. Reverse the process to install the belt.
Note: When replacing belts do not over-
tighten. Adjust the idler pulley so that a ten-
pound pull with a spring scale between two
pulleys deflects the belt about 1/2".
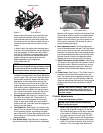
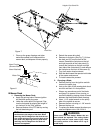
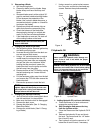
5. Changing the Spindle Assembly
a. Jack up the front of the mowing deck about
one foot and block it in that position.
b. Make sure the blade clutch is disengaged.
c. Remove the deck cover.
d. Remove the drive belts. (See 3. Changing
Blade Drive Belts.)
e. Remove the cutter blade. (See 2. Chang-
ing a Blade.)
f. Using a wrench or socket rachet remove
four hex nuts, and the four hex head cap
screws. Remove the spindle assembly.
Cover
Plate
Spindle
Figure. 8
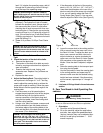
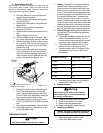
C.Hydraulic Oil
WARNING:
Never overfill the hydraulic units. Damage can
occur if the oil level is not within the proper
operating range.
Note: When adding hydraulic oil, do so in small
quantities and recheck the oil level before adding
more. It is important that you do not overfill the
reservoir to allow for fluid expansion.
Hydraulic Tank
Figure. 9
1. Adding Hydraulic Oil
(use Rimula SAE15W40)
a. Place the Mower on a level surface and
engage the parking brake.
b. Stop the engine and remove the key
from the ignition switch.
c. Clean the area around the Hydraulic Oil fill
neck.
d. Remove the hydraulic fill cap and check
the level. The correct level is a 1/4” below
the oil tank fill neck.
e. Pour hydraulic oil into the reservoir a 1/4”
below the oil tank fill neck, if necessary.