


13
G. Initial Adjustments
1. Check the fluid levels and tires:
Note: These checks should be made daily,
before starting the engine.
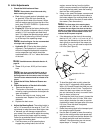
a. Fuel: Using a good grade of unleaded, regu-
lar gasoline, fill the fuel tank (beside the
engine on the left side of the mower). When
the fuel reaches one inch from the top of the
tank, stop. DO NOT OVERFILL. Space must
be left for expansion.
b. Engine Oil: (Filled at the factory before ship-
ment.) Pull out the oil dipstick, wipe it off and
reinsert it. Pull it out again and read the oil
level. If it is below the operating range, add oil
through the fill tube using a funnel to bring it
up to the top of the operating range.
Note: Gasoline Engine: For the recommended
oil weight refer to engine manual.
c. Hydraulic Oil: (Filled at the factory before
shipment.) The hydraulic oil is contained
within the integrated hydrostatic transaxles
and an expansion tank which should be
maintained with a 1/2” to 1” above the bottom
of the tank.
Note: See Maintenance Schedule Section E,
page 23.
d. Tires: 8-10 psi rear, 20-25 psi front caster
tires
Note: New tires are overinflated in order to
properly seat the bead to the rim. The normal
working pressure for the traction tires is 8-10 psi.
The front caster wheels should be inflated to 20-
25 psi.
2. Check that all Nuts, Bolts and Screws are
Tight.
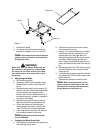
3. Check the tension of the deck drive belts.
a. Remove the deck cover
b. The tension of the deck drive belts are main-
tained by a spring mechanism that adjusts for
wear and stretch.
c. Examine the belts for cuts, fraying, and
excessive wear. Replace if any of these are
detected.
d. Replace the deck cover.
4.
Adjust the Mowing Deck:
The cutting height is
set in 1/4” increments in the range of 1" to 4". Do
not attempt to raise the mower deck higher than
4” because you will damage components on
your mower.
You may need to adjust the mowing
deck to achieve the proper angle for mowing.
Follow the procedures below to set the appropri
-
ate angle to the mowing deck.
a. Park the mower on a flat paved surface,
engage the parking brake, shut off the
engine, remove the key from the ignition
switch, remove connection of the spark plugs
and using the foot pedal, lower the mowing
deck into the cutting position.
b. Using a ruler, pencil and paper, measure and
note the distance from the paved surface to
the bottom edge of the mowing blade at the
front and the back of the deck on each side of
the mower. (Four dimensions.)
Note: The front edge of the mowing deck
should be 1/8"-1/4" (1/8” for 1-1/2” and 1/16” for
1”) below the rear edge of the deck so that the
blades are cutting grass in only the front half of
their circular path. This decreases friction and
reduces the drive power required.
c. If the dimension at the front of the mowing
deck is 1/8"-1/4"
(1/8” for 1-1/2” and 1/16” for 1”)
lower than the dimension at the rear of the
deck (pitch) on each side of the mower, do
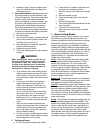
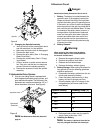
not adjust. If not, you will need to adjust the
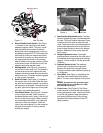
Lift Links (See Figure 5).
Figure. 5
jam nut
Trailing Link
Left Side
Adjustable Lift Link
rear nuts
outer nuts
d. To level the deck (side to side), place the
deck in the (3” suggested) cutting position.
With a 3/4” wrench loosen the lower jam nut
of the left side of the Lift Link. To adjust the
side of the deck up or down turn the upper
jam nut clockwise (to raise) or counter clock
-
wise (to lower) a few turns.
e. To change the pitch (front to rear), loosen the
lower nuts on the rear Lift Links. With a few
turns, adjust clockwise (to raise) or counter
clockwise (to lower) the upper nuts of the rear
Lift Links. Once the deck is adjusted,
retighten lower nuts.
f. Raise the mowing deck to the transport posi-
tion using the deck lift pedal.
g. Use the deck lift pedal to lower the mowing
deck to the cutting position and repeat step
“b.” above to make sure that the desired cut
-
ting height and pitch and level have been
attained. If the dimensions are not correct,
repeat steps “c.” through “f.” above.