


14
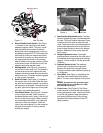
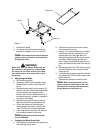
5. Lubricate all fittings listed in the mainte-
nance section.
H. Zero Turn Break-In And Operating Pro-
cedures
DANGER:
Reread the “When Mowing” Safety Precautions.
The following procedures are suggested for operators
of ride-on machines which have zero turn capabilities.
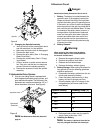
1. Orientation:
a. Read the entire Operator’s Manual.
b. Sit on the machine, adjust the seat fore-and-
aft, then adjust the speed/directional (lap bar)
controls (they can be adjusted fore-and-aft,
as well as up-and-down — 9/16" wrench
required).
c. Become familiar with all of the machine con-
trols, instrumentation, safety and instruction
signs, and safety devices.
d. Move (or have moved) the machine to a safe,
level area with no obstructions including
objects, pedestrians, and animals.
2. Initial Operation:
a. Use protective equipment for eyes, hands,
hearing, feet, legs, head and other areas of
the body if needed — safety eye glasses,
gloves, earplugs, boots, hats, etc.
WARNING:
Hearing Protection is required for all operator
exposure exceeding two (2) hours.
b. Ensure that the area is free of animals and
bystanders, especially children!
c. Survey the area where the equipment is to be
used to make sure it is free of debris, sticks,
stones, wires, bones, and other foreign
objects which could cause injury to bystand
-
ers, damage to the machine, or damage to
nearby facilities.
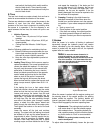
d. Inspect the machine to make sure:
1. All guards, shields (including mower chute
deflector) are in their proper place, are
secure, and are functional.
2. That there are no spilled or leaking fuel or
oil sources, nor loose fuel or hydraulic tank
caps, hoses or fittings.
3. That there are no loose or missing hard-
ware nor any missing items.
4. That no non-approved devices are
installed.
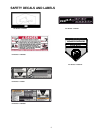
5. That all safety signs and decals are prop-
erly installed and legible.
e. This is a one person machine, operator only!
Riders are not permitted under any circum
-
stance!
f. To start the engine on the machine:
1. Make sure the park brake is set to the “ON”
position, both lap bars are in the neutral/
start position, and the Power Take Off (PTO
also referred to as blade control switch) is
in the “off” (down) position.
2. Move the choke and the engine speed con-
trol (throttle) forward to the end of the slot.
3. Insert the ignition key, turn the switch
toward the spring-loaded “Start” position,
maintain the Start position until the engine
begins to run, then release the switch (it will
return to the “Run” position).
4. Move the choke/speed control slowly by
moving it rearward. If the engine is “cold”,
the choke may need to be partially applied
for a few minutes. Be sure to move the
choke/throttle after the engine has
“warmed up” to the detent.
g. Check safety devices:
1. With the park brake engaged, try to move
one of the lap bars (speed/directional con
-
trol) from the neutral/start position, it
should not move.
2. Repeat this procedure with the opposite
side lap bars.
3. With the park brake engaged and the lap
bars in the neutral/start position, advance
the engine speed control completely for
-
ward (Hi-idle), engage the PTO control
switch (pull upward), then lift off the seat —
the engine should stop running. Sit down
and the engine should run. Turn off the
PTO by pushing the control switch down.
h. To drive in the FORWARD direction:
1. Set the engine speed to 2000 to 2500 rpm
(refer to optional tachometer on right con
-
trol panel). This must be increased to full
speed (3525-3675 rpm) after becoming
familiar with the machine.
2. Release the park brake.
3. Slowly, move both lap bars toward the front
of the machine until the machine begins to
move forward — release the lap bars and
the machine should stop. The more that the
lap bars are moved toward the front of the
machine, the faster the machine will move
in the forward direction. Release the lap
bars and the machine should stop traveling
forward. (This is a safety check, the normal
procedure is for the operator to slowly bring
the lap bars to the neutral position).
4. Do not advance the lap bars rapidly as this
could cause turf defacement, loss of trac
-
tion, and/or instability.
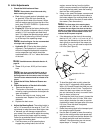
5. To turn, advance one lap bar ahead of the
other and the machine will turn toward the
opposite from the side that was advanced
— I.E. to turn clockwise (to the Right),
move the LEFT lap bar forward more than
the right side, and to turn counter-clock
-
wise (to the LEFT), move the RIGHT lap