12 se c t i O n 5 — ad j u s t M e n t s , cO n t r O l s & Op e r a t i O n
CONTROLS
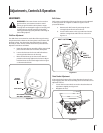
The thrower controls are conveniently located to be operated
from the operator’s position on the tractor.
Lift Lever: 1. The tractor hydraulics and front hitch system
are used to raise or lower the snow thrower. If installed as
recommended, the inner lift handle should control the
front hitch system. Pull the lift handle upward (rearward)
to raise the snow thrower. Push the lift lever downward
(forward) to lower the snow thrower to the ground.
Front Power Take-Off (PTO): 2. The tractor front PTO switch
controls engagement of the snow thrower. To engage the
auger, pull the PTO switch handle upward. Push the PTO
switch handle downward to disengage the PTO and stop
the snow thrower auger.
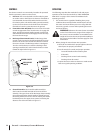
Discharge Chute Control Crank: 3. The discharge chute
control crank is located on the left hand side of the snow
thrower. The chute crank controls the direction in which
the snow is thrown. The discharge radius is 190 degrees.
Turn the crank clockwise to rotate the discharge chute
opening toward the left, and counterclockwise to rotate
toward the right. Refer to Figure 5-4.
Chute Tilt Handle: 4. The chute tilt handle assembly is
also located on the left hand side of the snow thrower
assembly. The upper chute of the discharge chute assembly
pivots downward when the tilt handle is pushed forward,
decreasing the distance snow is thrown. Pulling the handle
backwards pivots the upper chute upward, increasing the
distance snow is thrown. Refer to Figure 5-4.
OPERATION
The following steps describe methods for safe and proper
operation of this snow thrower. Refer to “SAFE OPERATION
PRACTICES” on page 3 of this manual for additional safe
operating practices.
The snow thrower is capable of handling heavy snow 1.
conditions. Become fully familiar with all aspects of both
the tractor and snow thrower prior to its usage. DO NOT
remove any guards or covers while operating the tractor
and snow thrower.
WARNING! Whenever the snow thrower is installed
on the front of the tractor, usage of rear weights on
the tractor is recommended to counterbalance the
weight of the snow thrower and provide stability to
the tractor. See the Table of Contents page for more
information.
Before placing the snow thrower into operation:2.
a. Check all nuts and bolts for proper tightness. Be sure
that all parts are properly assembled.
b. Test all controls for smooth and proper operation.
Tractor lift handle and front hitch system •
PTO switch•
Discharge chute control crank assembly•
Discharge chute tilt control•
c. Inspect the tractor and snow thrower to make certain
both are in good operating condition.
UPPER CHUTE
DISCHARGE
CHUTE
CHUTE TILT
HANDLE
CHUTE
CRANK
ROD
Figure 5-4


