


OPERATHON
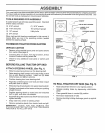
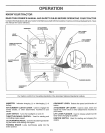
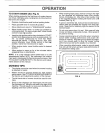
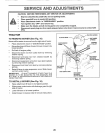
TO OPERATE MOWER (See Fig. 7)
Your tractor is equipped with an operator presence sens-
ing switch. Any attempt by the operator to leave the seat
with the engine running and the attachment clutch engaged
will shut off the engine°
. Select desired height of cut.
° Start mower blades by engaging attachment clutch
control.
° TO STOP MOWER BLADES - disengage attachment
clutch control
CAUTION: Do not operate the mower
without either the entire grass catcher,
on mowers so equipped, or the dis-
charge guard in place.
ATTACHMENT CLUTCH LEVER
"DISENGAGED" POSITION
"ENGAGED"
POSITION
ATTACHMENT
LIFT LEVER
HIGH POSITION
_._, ."_ POSITION
FIG. 7
DISCHARGE
GUARD
TO OPERATE ON HILLS
,11
CAUTION: Do not drive up or down I
hills with slopes greater than 15° and
do not drive across any slope. I
Choose the slowest speed before starting up or down
hills,
,, Avoid stopping or changing speed on hills..
° If slowing is necessary, move throttle control lever to
slower position
° If stopping is absolutely necessary, push clutch/brake
pedal quickly to brake position and engage parking
brake°
Move gearshift lever to 1st gear. Be sure you have
allowed room for tractor to roll slightly as you restart
movement..
• To restart movement, slowly release parking brakeand
clutch/brake pedal,.
° Make all turns slowly
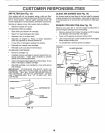
TO TRANSPORT
• Raise attachment lift to highest position with attach-
ment lift control,
° When pushing or towing your tractor, be sure gearshift
lever is in neutral (N) position.
o Do not push or tow tractor at more than five (5) MPH.
NOTE: To protect hood from damage when transporting
your tractor on a truck or atrailer, be sure hood isclosed and
secured totractor,. Use an appropriate means of tying hood
to tractor (rope, cord, etc_).
BEFORE STARTING 3"HE ENGmNE
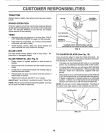
CHECK ENGINE OIL LEVEL (See Fig, 12)
= The engine in your tractor has been shipped, from the
factory, already filled with summer weight oil,
• Check engine oil with tractor on level ground..
° Remove oil fill cap/dipstick and wipe clean, reinsert the
dipstick and screw cap tight, wait for a few seconds,
remove and read oi! level, if necessary, add oil until
"FULL" mark on dipstick is reached, Do not overfill.
° For cold weather operation you should change oil for
easier starting (See "OIL VISCOSITY CHART" in the
Customer Responsibilities section of this manual)_
o To change engine oil, see the Customer Responsibili-
ties section in this manua[_
ADD GASOLINE
• Fill fuel tank. Use fresh, clean, regular unleaded
gasoline. (Use of leaded gasoline will increase carbon
and tend oxide deposits and reduce valve life),.
IMPORTANT: WHEN OPERAT;NG IN TEMPERATURES
BELOW 32°F(0°C), USE FRESH, CLEAN WINTER GRADE
GASOLINE TO HELP INSURE GOOD COLD WEATHER
STARTING.
WARNING: Experience indicates that alcohol blended
fuels (called gasohol or using ethanol or methanol) can
attract moisture which leads to separation and formation of
acids during storage° Acidic gas can damage the fuel
system of an engine while in storage° To avoid engine
problems, the fuel system should be emptied before stor-
age of 30 days or longer. Drain the gas tank, start the
engine and let it run until the fuel lines and carburetor are
empty. Use fresh fuel next season. See Storage Instruc-
tions for additional information Never use engine or
carburetor cleaner products in the fuel tank or permanent
damage may occur_
CAUTION: Fill to bottom of gas tank
filler neck. Do not overfill. Wipe off any
spilled oil or fuel. Do not store, spill or
use gasoline near an open flame.
13