


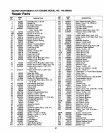
11.Very lmportantH!! You must clean any paint or rust in the bore area by sanding it off. The paint wi}l be from
the snap ring groove outward. After removing ALL uaint and rust leaving a smooth surface, coa_ exposed area
inside cylinder with grease If you do not do this, fiJrther disassembly will be difficult and damage may result
during reassemhIy!
USE EXTREME CAUTION DURING NEXT STEP).). ).
12. Put control lever in neutral and start engine. Set engine at low idle speed, and use control valve lever 1o extend
rod out of cylinder until cylinder rod cap just starts to move. Put control lever in neutral, shut off engine and
disconnect spark plug wire.
13. Have someone hold control lever in extend position and pull engine starter rope to extend rod slowly until the
cy [nder rod cap can be pulled free of the cylinder. Do not remove end cap from rod.
14. Remove steel tube from fitting at end of cyl_nder and attach a ¾'" I.D. hose to fitting on the e_linder using ahose
damp. Place other end of hose into catch container.
15. Push rod into cylinder using cylinder rod cap as a guide. This will force oil out of cylinder through hose and into
container. Do nol push turn down of rod into cylinder rod cap as damage to cap may result. Remove hose from
cylinder.
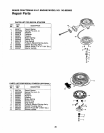
16. You are now ready to pull rod and piston assembly from cylinder barrel_ Be sure to have a piece of wood, thick
cardboard or pile of rags on the beam so that when you pull the rod out of the cylinder the piston won't be
damaged by droptfing down on the beam Install a suitable bar or large screwdriver through bolt hole in rod and
pull rod, cylinder rod cap and piston out of cylinder.
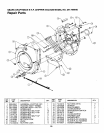
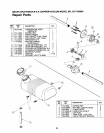
17". Set rod and piston assembly on clean bench and with a light examine inside of cylinder barrel for gouges and
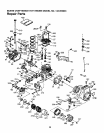
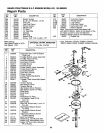
scratches. If scratches exist you should replace the complete cylinder. Do not attempt to hone cylinder as any
reduction of wall thickness can result in a safety problem, If no damage to cylinder is apparent, proceed with
repair.
18. Prop cylinder up as close to vertical as possible with a wood block.
19. Bolt rod to wedge ram placing a wood block under rod to keep piston from hitting beam. Remove nut from
piston end of rod and slide piston and cylinder rod cap off threaded end of rod.
20. Examine piston and rod cap for damage. Remove old seals, bearings and o-rings from rod, pisto_ and cylinder
rod cap. Pay attention to alignment of seals as some are directional. Be very careful not to scratch the walls
of the seal grooves. Scratches can render the rod cap or piston unusable.
21. Using a tap and die or thread file, clean threads on rod and nut.
22. Cleanliness is vital throughout reassembly! Clean piston, rod, end cap and cylinder.
23. Lubricate seals and bearings with hydraulic oil and install them in end cap and piston.
24. Lubricate inside of cylinder rod cap and piston with general purpose grease and carefully install them on rod from
threaded end being careful to start wiper lip onto rod and then working cylinder rod cap on. Any attempt to
install the cap from the rod turn down end will result in seal lip damage.
25. Clean grease from exposed threads on rod and install piston nut on rod using red Loctite. Torque nut to
300 - 325 ft.-lbs, and restake in place to prevent the nut from backing off.
26. Remove rod assembly from wedge and set aside in a clean place being careful not to damage seals. Lower
cylinder to angle at which rod may be reinserted.
27..Lubricate inside of cylinder _t__'thhydrau!{c oil and grease the end cap and piston.
28. Insert piston into cylinder being careful to not damage seals. Slide assembly in until piston is approximately 12"
into barrel, then slide rod cap into cylinder and tap it injust past snap ring groove. Do not go farther than
necessary to install snap ring as damage to seals may occur, install snap ring.
29. Place control valve in neutral. Reattach tube to cylinder and wedge to rod.
30. Add oil to tank to within 1" from top. Start engine and slowly cycle control valve several times to fill cylinder.
There will be a !oud "POP" as cylinder rod cap seats over snap ring. (Cylinder may act jumpy until cylinder self
purges of air.) When cylinder is full, retract ram fully and stop engine. Top offoil to within 1.5" to 2" from top
of tank.
3 I. Remove wedge from rod and prop cylinder up again. Clean and paint area of cylinder bore you originally sanded.
32. Complete reassembly, cycle unit and check for leaks. If possible, test on a few logs.