


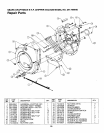

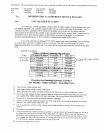

Seal kits for the new cylinders are the same as for the old cy ind.ers_as a!l me internal components are the same,
bore diam old cylinder new c_inder sealkit
4,0" 718-0307 718-0773 753-0490
4.5" 718-0306 718-0769 753-0563
To; ¸
DISTRIBUTORS & AUTHORIZED SERVICE DEALERS
Re: LOG SPLITTER SEAL KITS
As of February 1. 1999. log splitter cylinders under warranty capable of being repmred with a seal
kit must be repaired. Any cylinders replaced under warranty will be called back for inspection. Any
cylinder found to be repairable will be returned to the dealer and the dealer will be charged back the
amount paid on the claim for the cylinder. Labor already paid will not be charged back. If replacement is
determined to have been the only solution to the problem, no action will be taken. If you have any
questions regarding this policy or how to handle a situation please contact MTD service.
If you need a pressure test kit (part # 759-3742), contact your central distributor. This kit includes
an ins,_"uc=ional video and is a,:ailable for loan or purchase. You will be rei_b'arsed for t_hc cost of
shipping and handling on a warranty job if you used a test kit on loan and include the amount on the claim
form.
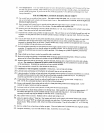
Seal kits are as follows.
Fisher cylinders (retaining ring end cap):
Md_J CYLINDER NUMBER CYLINDER I.D. SEAL KIT
_z._,...>718-0306
_zb-e 718-0307
718-0312
718-0313
4.5"
4.0"
4.25"
5.0"
753-0563
753-0490
753-0637
75320564
Best Metal cylinders (thread on end cap):
CYL NDER NOMBER [ CYLINDER I.D. SEAL KIT
718-0307 [ 4.0" 753-0689
718-03'13 ! 5.0 _'' 753-0691
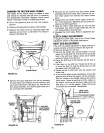
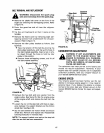
Procedure for Resealing Hydraulic Cylinders
(On Machine - Fisher Cylinders - Snap-Ring Type)
1. Clean cylinder, wedge and beam area.
2. Fully retract cylinder rod into cylinder - stop engine.
3. With engine off, move control valve back and forth several times to be sure there is no pressure in system.
4. With a clean catch container in place, disconnect pump to control valve hose from pump fitting and in_ert end
into container. Plug fitting on pump with plastic cap or tape. This is to prevent dirt from entering fitting,
5. Remove (4) ¥I" bolts securing the log dislodger and remove dislodger.
6, Remove %" bolt through wedge and cylinder rod. Slide wedge all the way forward on the beam till it meets the
base plate. No need to remove wedge from beam,
Z. Lift rod up and place wood block under cylinder barrel to hold assembly at an angle, This will allow for rod
removal
8. Place control valve into detent position
9, Using a wood dowel or a hammer handle, tap cylinder rod cap into cylinder just beyond the snap ring. Do not go
any farther than necessary as it will make further disassembly very dit_cult. Remove snap ring from groove
being careful not to scratch groove or bore. If you do, you must polish scratched area with fine emery so scratch
won't damage new seals as they pass the area It is an easy job if you tap one end of snap ring into the cylinder
first, and then get a medium screwdriver under the ring to pry it our.
10. Reconnect and tighten hose to pump.