


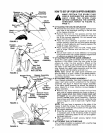
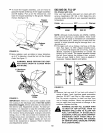

• To lower the hopper assembly, use one hand to
grasp the handle at the top of the hopper assembly
and lift slightly. Pull up on the release bar, and
lower the hopper assembly to the ground. Release
the bar. See figure 10.
---______ Hopper
_ ---. Assembly
FIGURE 10.
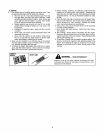
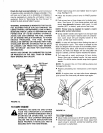
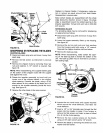
• Bulky material, such as stalks or heavy branches,
up to 3" in diameter, should be fed into the chipper
chute. See figure 11.
WARNING: MAKE CERTAIN THE CHIP-
PER CHUTE DOOR IS CLOSED WHEN
NOT IN USE.
3" Maximum
Diameter
Chipper
Chute
FIGURE 11.
IMPORTANT: There is a flail screen located inside
the housing in the discharge area. If the flail screen
becomes clogged, remove and clean as instructed in
the Service and Adjustments section. For best per-
formance, it is important to keep the shredding blade
and the chipper blades sharp. If the composition of
the material being discharged changes (becomes
stringy, etc.) or if the rate at which the material is dis-
charged slows down considerably, it is likely that the
shredding blade and/or chipper blades are dull and
need to be sharpened or replaced. Refer to Service
and Adjustments section.
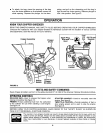
GASAND OIL FILL-UP
OIL (Packed with Unit)
Only use high quality detergent oil rated with API
service classification SF, SG or SH. Select the oil's
viscosity grade according to your expected operating
temperature.
Colder _ 32°F _- Warmer
5W30 SAE 30
NOTE: Although multi-viscosity oils (5W30, 10W30,
etc.) improve starting in cold weather, these multi-
viscosity oils will result in increased oil consumption
when used above 32°F. Check your oil level more fre-
quently to avoid possible engine damage from run-
ning low on oil.
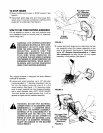
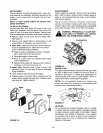
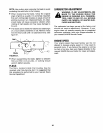
• Fill engine with oil as follows. Remove oil fill dip-
stick. See figure 12. With chipper-shredder level,
use a funnel to fill engine with oi! to FULL mark on
dipstick. Capacity is approximately 21 ounces. Be
careful not to overfill. Tilt chipper-shredder toward
the left (from behind the hopper), then re-level.
Check oil level. Refill to FULL mark on dipstick if
necessary. Replace dipstick and tighten.
Oil
Dipstick
FIGURE 12.
Oil
Drain
GAS
• Remove fuel cap and fill fuel tank with about 3
quarts of clean, fresh, lead-free grade automotive
gasoline. DO NOT use Ethyl or high octane gaso-
line. Be certain container is clean and free from
rust or foreign particles. Never use gasoline that
may be stale from long periods of storage in the
container. Replace fuel cap.
WARNING: DO NOT FILL CLOSER THAN
1/2 INCH OF TOP OF FUEL TANK TO
PREVENT SPILLS AND TO ALLOW FOR
FUEL EXPANSION. IF GASOLINE IS
ACCIDENTLY SPILLED, MOVE CHIPPER-
SHREDDER AWAY FROM AREA OF
SPILL. AVOID CREATING ANY SOURCE
OF IGNITION UNTIL GASOLINE VAPORS
HAVE DISAPPEARED.
10