


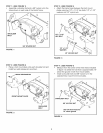
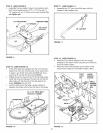

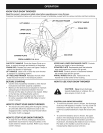
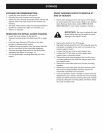

ATTACHING SNOW THROWER TO TRACTOR
STEP 22:
e
e
e
e
e
(SEE FIGURE 22)
Place the snow thrower on a flat, level surface.
Extend the auger belt out behind the snow thrower,
leaving the belt assembled to the snow thrower pulleys.
Roll the tractor up behind the snow thrower, centering
it between the snow thrower's mounting plates.
Remove the Attachment Pin from the snow thrower.
Raise the rear of the snow thrower by lifting up on
the lift handle until the notches in the mounting plates
align with the shoulder bolts in the tractor's side
plates. Guide the bolts into the notches.
Delay installing the attachment pin until you have
assembled the belt as instructed in steps 23 and 24.
ATTACHMENT PiN
(After installing auger belt)
1/8" HAiRPiN
COTTER
SHOULDER
BOLT
SIDE PLATE
MOUNTING
PLATE
FIGURE 22 RIGHT SIDE VIEW
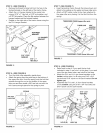
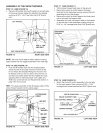
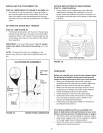
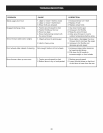
iNSTALLiNG THE AUGER BELT
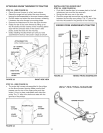
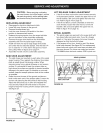
STEP 24: (SEE FIGURE 24)
• Push the lift handle down to increase slack in the belt
(attachment pin must first be removed).
Swing the idler arm over to the side.
Place the auger belt around the rear pulley and
between the two idler arm pulleys. The "V" side of the
belt must be seated in the grooves of the V-pulleys.
VIEWED FROM UNDERNEATH TRACTOR
AUGER
BELT
iDLER
ARM
FIGURE 24 VIEWED FROM UNDERNEATH
STEP 23: (SEE FIGURE 23)
The auger belt comes pre-assembled to the pulleys
on the snow thrower housing. Make sure the belt
passes over the top of the auger pulley and then
twists 1/4 turn to pass underneath each side idler
pulley. The "V" side of the belt must mate with the
grooves of the pulleys.
TWIST
1/4 TURN
AUGER PULLEY
TWIST
1/4TURN
FIGURE 23
t
BELT ROUTING DIAGRAM
_ ENGINE PULLEY
14